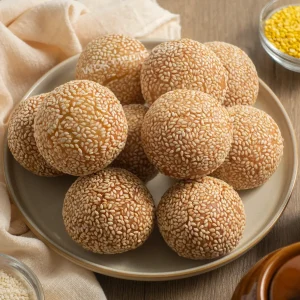
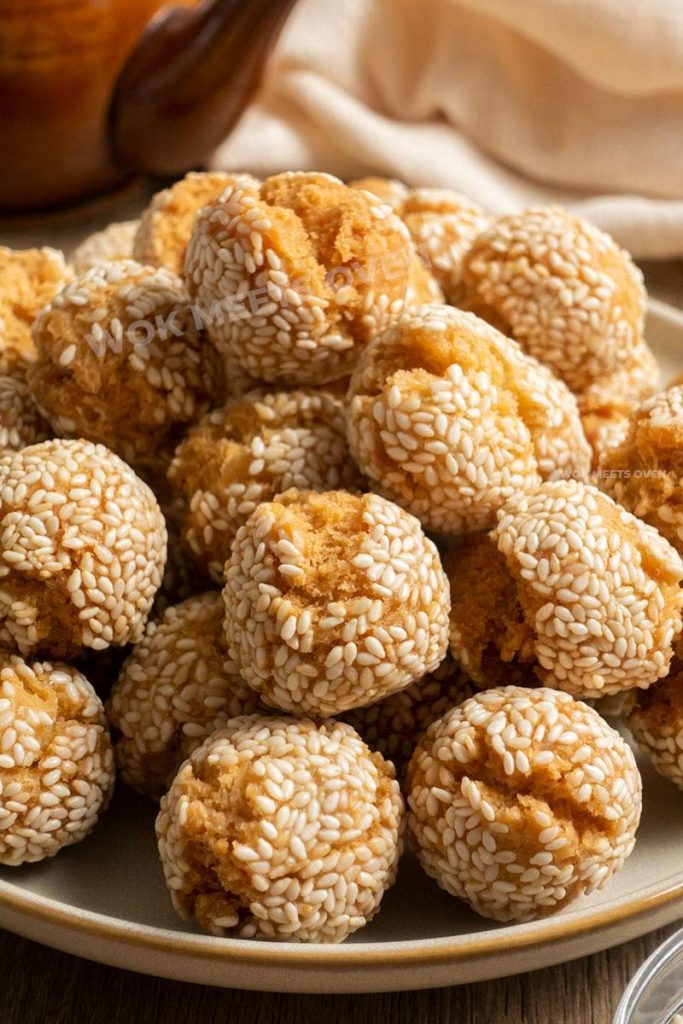
Chinese Smiling Sesame Balls (笑口棗)
Crispy, golden Chinese smiling sesame balls with a sweet, soft center and the signature crack—These smiling sesame ball cookies are easy to make and perfect for snacks or celebrating Chinese New Year.

What Are Chinese Smiling Sesame Balls?
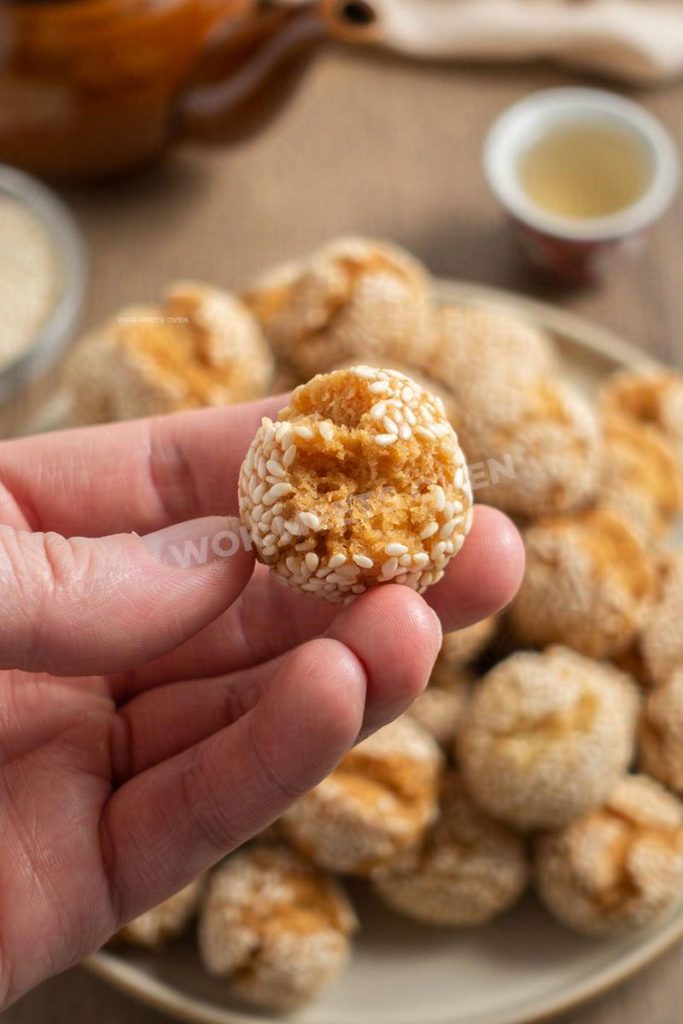
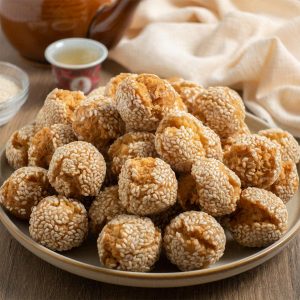
Every year during Chinese New Year, these Chinese smiling sesame cookie balls make an appearance. Chinese smiling sesame balls also known as 笑口棗 in Cantonese is a popular lunar new year snack. The cookies are crispy and crunchy on the outside yet soft and tender on the inside. The Chinese New Year cookies are coated with sesame seeds all around them, giving them an extra nutty flavor, but the most interesting thing is the small cracks that you see on top of the cookies, which are highly prized.
A beautiful crack on top of the cookies that creates a “smile” indicates that the sesame cookie balls were fried perfectly and symbolizes happiness, laughter, and good luck.
I first discovered these cookies when I was a kid celebrating Chinese New Year with my parents. I saw them at a Chinese grocery store in Chinatown back when my family was still living in Chinatown.
What caught my eye and made me curious about them was the large cracks that I saw on each cookie that was coated in sesame seeds. I wondered what they tasted like. All of the cookies were stored inside of a large round plastic container with a red lid so I begged my folks to buy them for me.
As soon as I bit into them, I tasted a variety of different textures and flavors, from crunchy and nutty to sweet and soft. I ended up wolfing down half the container before the end of the day was over lol.
Now, as I get older, making Chinese smiling sesame balls has become more than just making a fun snack in the kitchen; it’s a way for me to connect with my heritage and the traditions I grew up with.
Each cookie that I touch and bite into brings a wave of nostalgia, letting me relive my childhood memories of celebrating Chinese New Year with my family or all the festive activities and decorations at Chinese shops and supermarkets during Lunar New Year.
Anyone remember all those lion dance performances in front of the shops during Chinese New Years and the staff handling out the red pockets filled with $1-2? 🤣
Every time I make these cookies, I always get a jolt of those memories from the good old days.
While making Chinese new year smiling sesame balls at home isn’t particularly difficult, there are some things that you should be aware of.
Luckily though, my Chinese smiling sesame ball recipe is pretty straight-forward.
Let’s now discuss some of the key ingredients.
Ingredient Notes
White sesame: The star ingredient of this recipe. These seeds add a nice nutty crunchy texture to our cookies, not to mention making them look more attractive. You’ll want to use white sesame seeds for this recipe if you want to be a purist.
Cake flour: Cake flour has a lower protein content compared to all-purpose flour or bread flour, making it the best choice for keeping the center of our cookies soft and tender with a bit of chew.
Eggs: The eggs provide moisture, richness, and structure to our dough. They also help our sesame balls brown up nicely when fried.
Substitutions
- White sesame seeds: I suppose you could use black sesame seeds if you really wanted to.
- Cake flour: I’m a little hesitant to suggest all-purpose flour but I suppose it could work too. I’d recommend using cake flour unless you absolutely can’t get a hold of cake flour.
- Eggs: You can use whatever type of eggs that you prefer, such as regular, omega-3, free-range, maybe even ostrich eggs or eggs from another planet (In case you’re wondering whether or not I’m being serious, I’m not 😑)
- Cooking oil: The recommended cooking oils that I suggest to use are vegetable, canola, corn, and peanut oil. Don’t use olive oil!
How to Make Smiling Sesame Balls
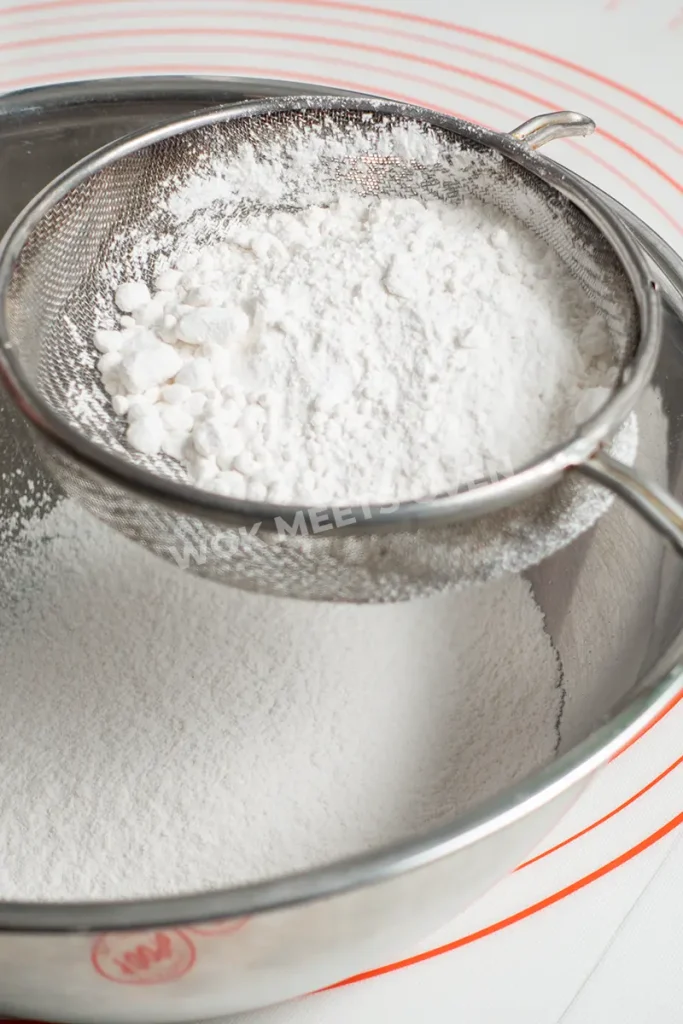
- Add flour, baking powder, baking soda into a bowl.
- Sieve it into a large mixing bowl.
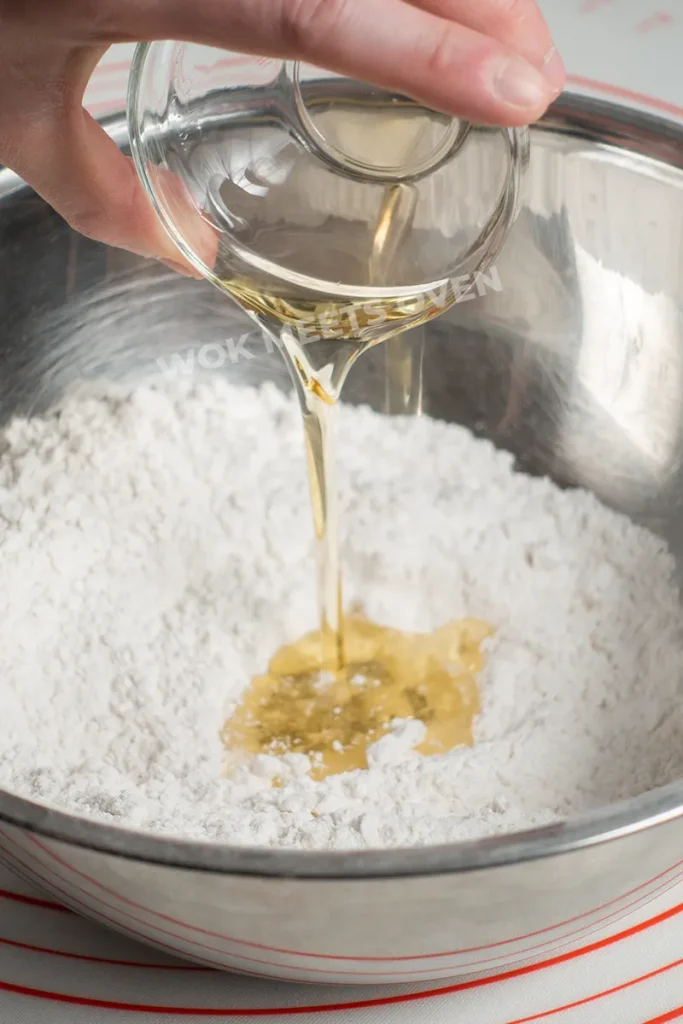
- Next, add in your sugar and give it a quick mix.
- Add in your oil. Give it a quick mix.
- Then add in the eggs.
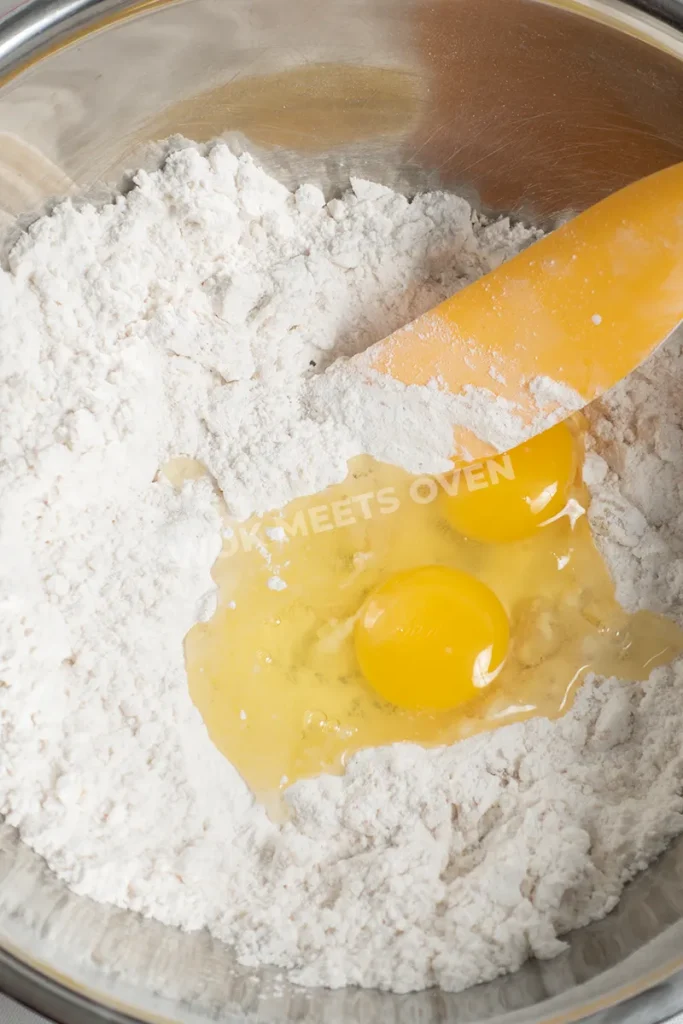
- Mix everything well together.
- Now, knead the dough until all of the ingredients are mixed well together and there are no more flour spots (about 1-2 minutes).

- Cover the dough and let it rest for 25 minutes.
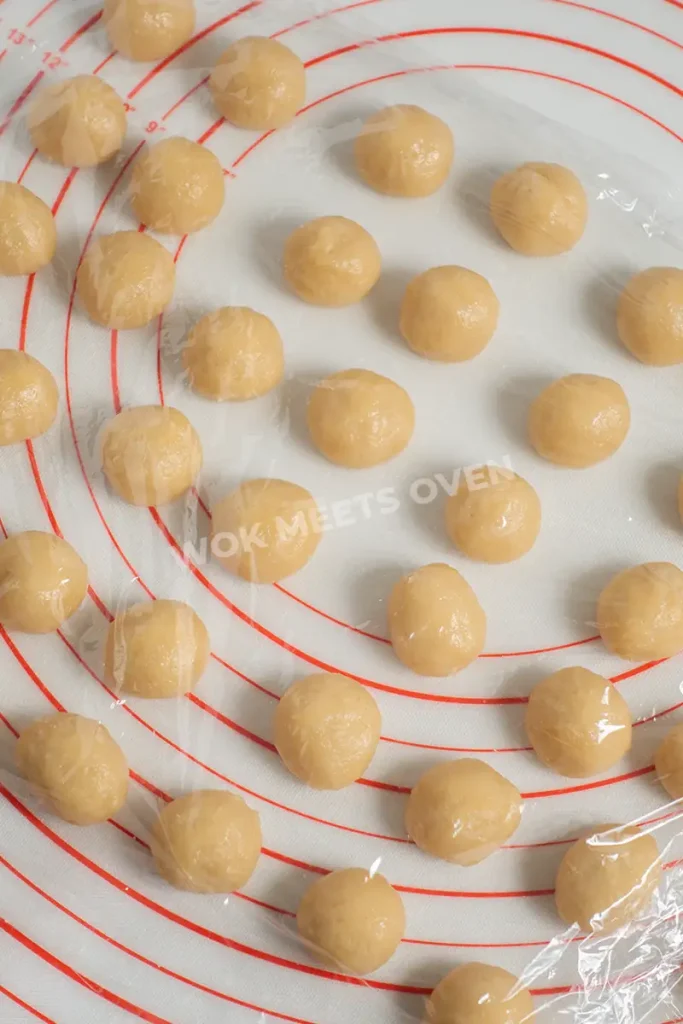
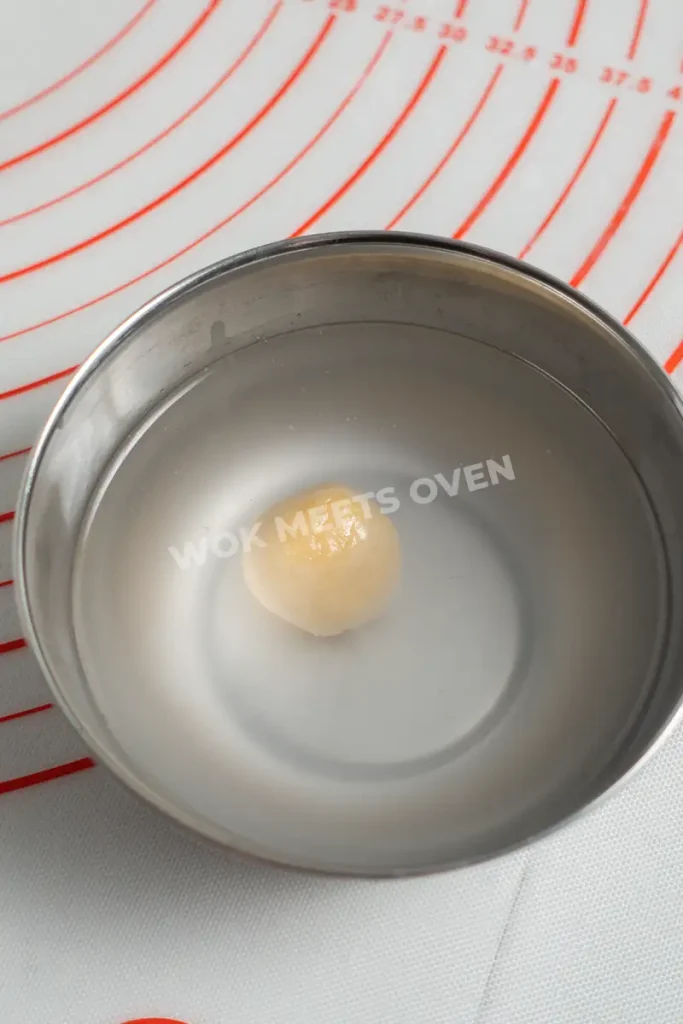
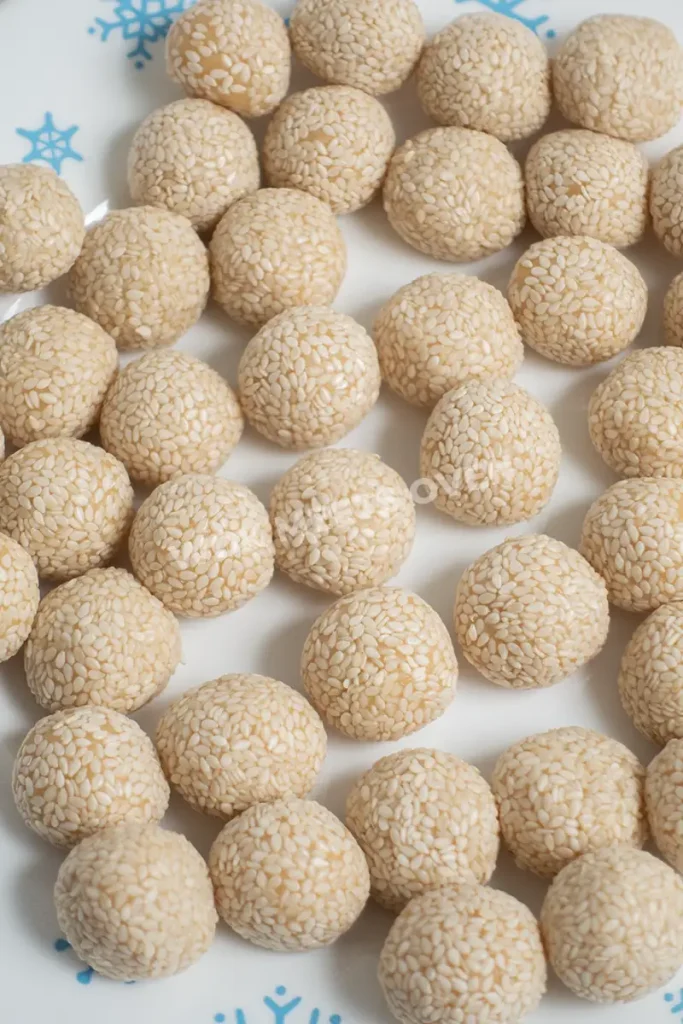
- Then divide the dough into balls that weigh about 10g each. I highly suggest using a kitchen scale to weigh out each piece so that you get equally sized balls.
- Next, dip each dough ball into water and roll it in sesame seeds. You can also rub water onto the dough balls (my preferred method).
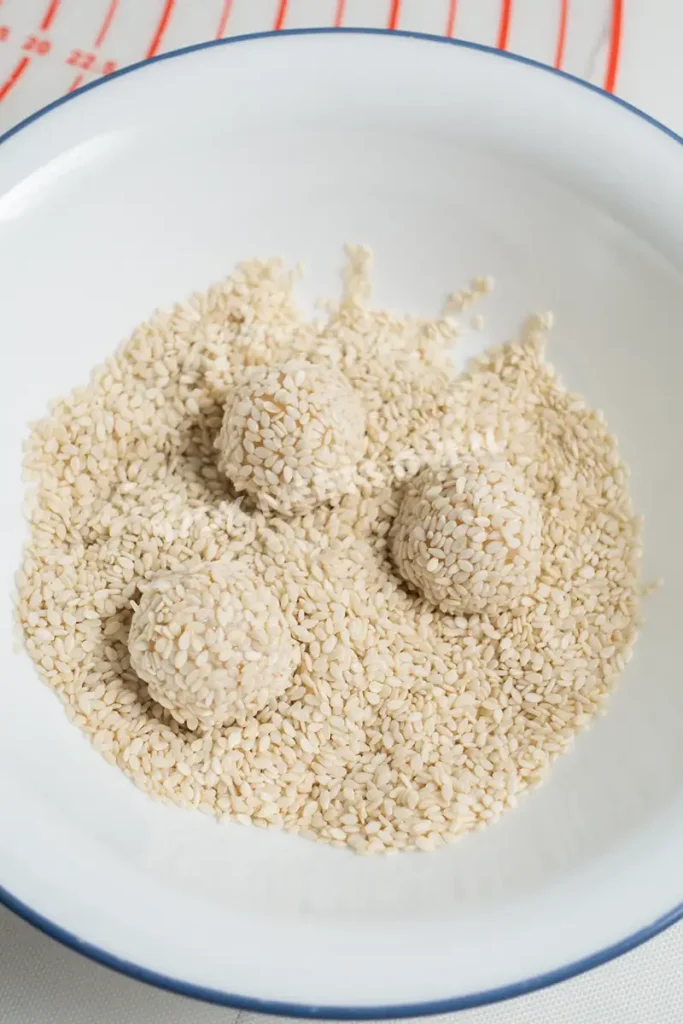
- Then pack the sesame seeds into the balls so that they don’t fall off by gently squeezing the balls.
- Cover the sesame balls and set them aside for now.
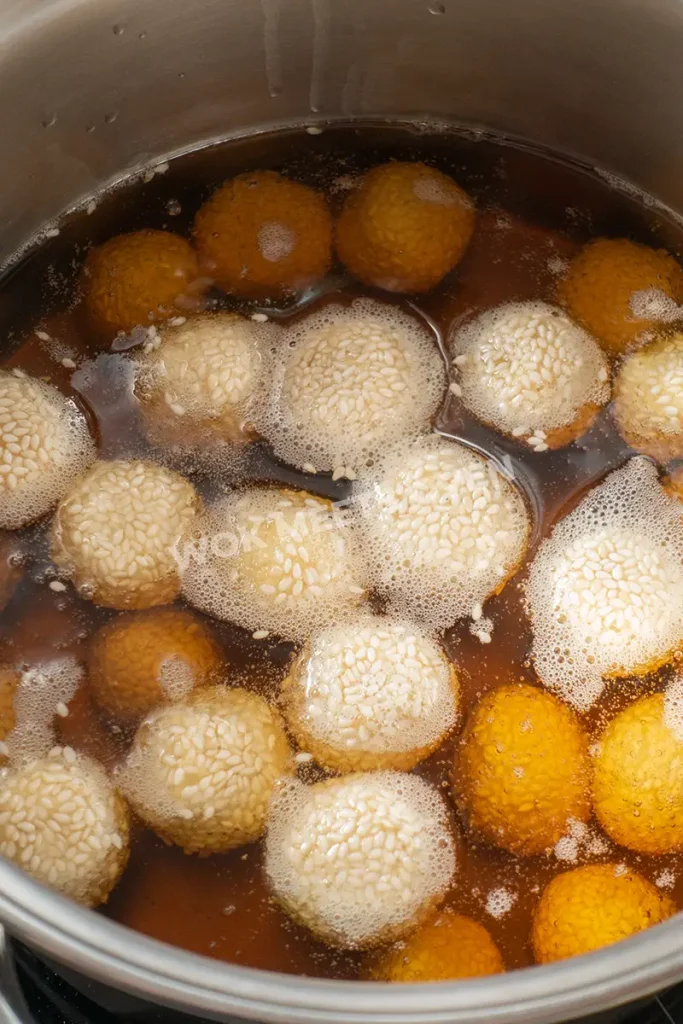
- Next, heat up a pot of oil until it reaches between 130°C-135°C. Make sure that there is enough oil to fully submerge the sesame balls.
- Once the oil temperature reaches between 130°C-135°C, add the sesame balls. Don’t overcrowd the pot, as you’ll need to move the sesame balls around.
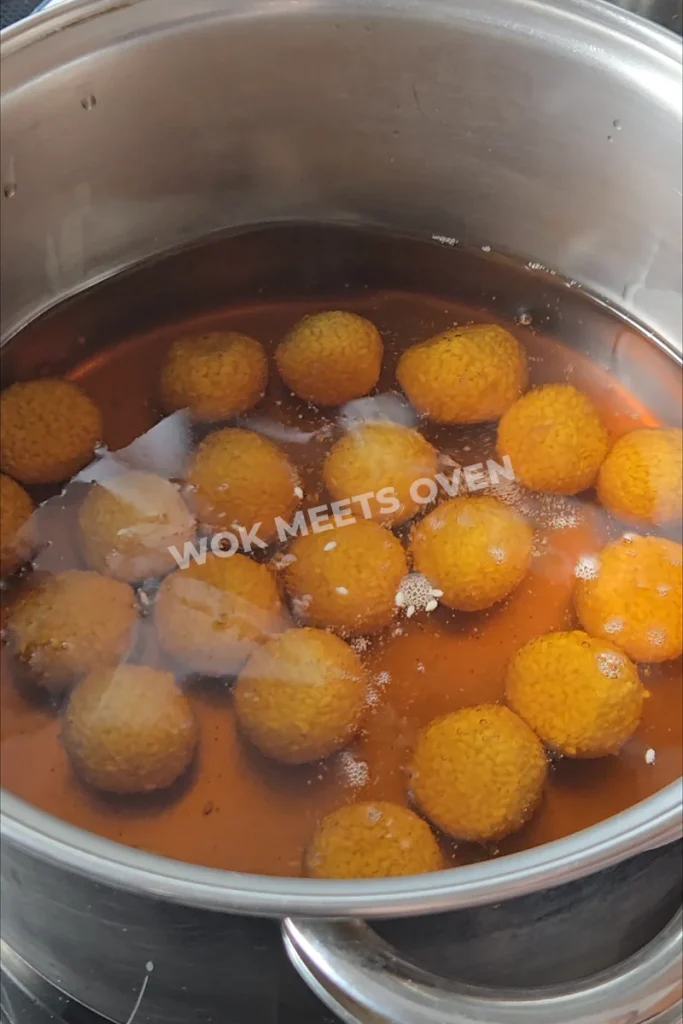
- Then, turn off the stove. Yes, turn it off!
- Let the sesame balls slowly float to the top then turn on the lowest setting.
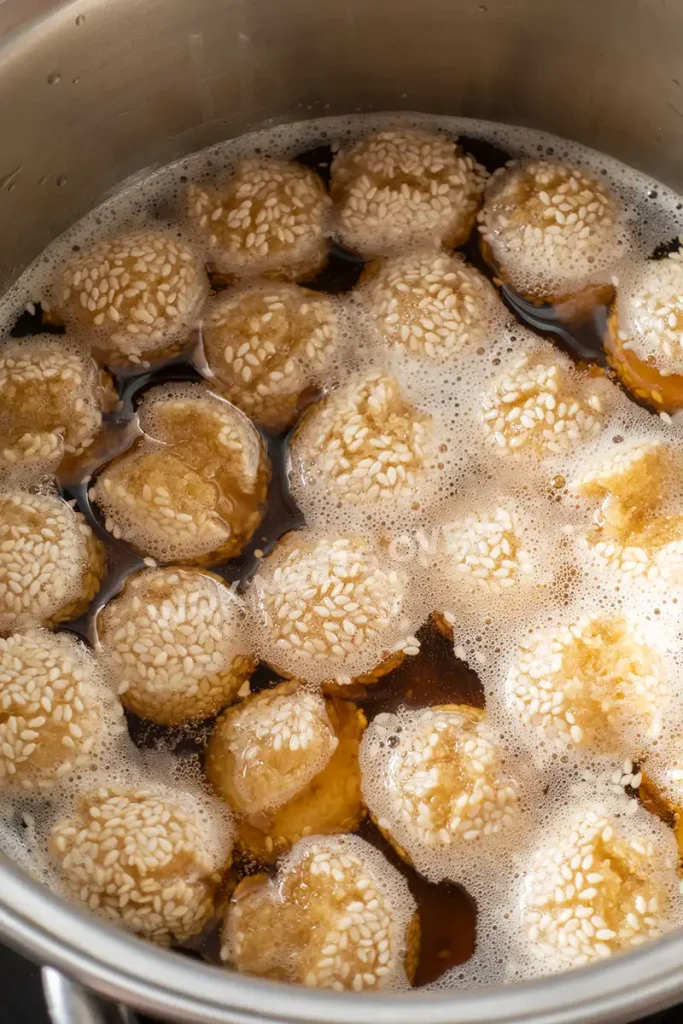
- Let them fry for about 5 minutes on the lowest setting then increase the temperature to medium-low heat and fry for another 3-4 minutes and then finally increase the temperature to medium or medium-high heat and fry for another 1-2 minutes until golden brown. Total frying time should be approximately 10-11 minutes. Do not let it get too brown while frying on medium/medium-high heat; it will continue to cook and get darker once you remove it from the hot oil! Make sure to occasionally move the balls around in a circular motion using a spider strainer or some chopsticks while slightly pushing the balls back into the oil.
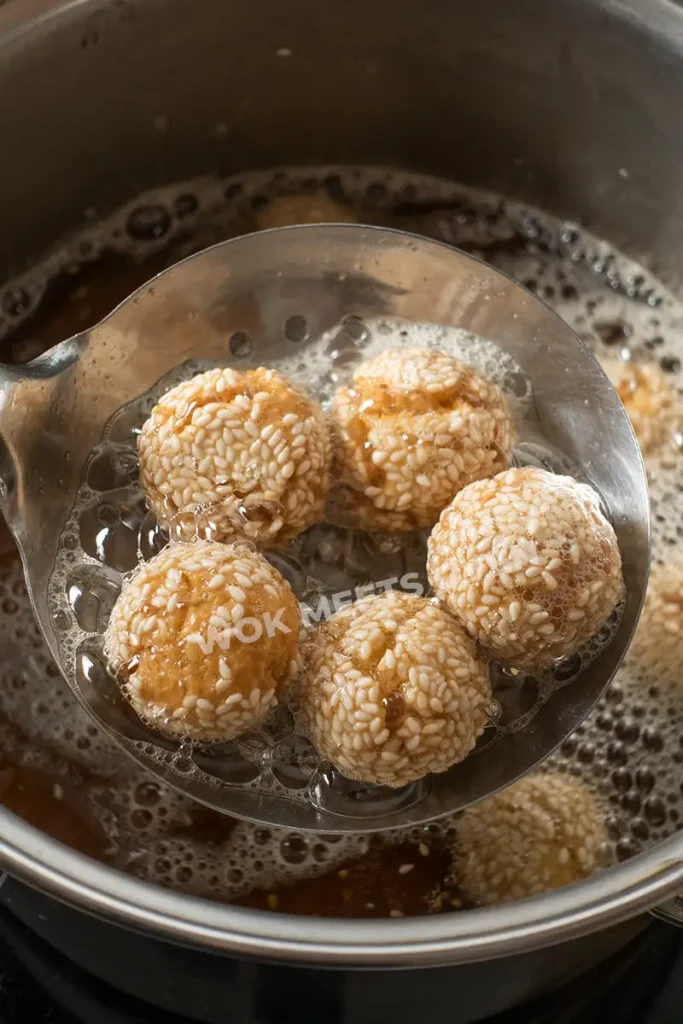
- Once done, remove them from the oil and let them cool down before serving.
A Few Helpful Tips
Common Mistakes Beginners Make
- Smiling sesame balls becoming burnt or too dark. This is caused by frying the sesame balls at a high temperature too quickly. The sesame balls should first be fried at a very low temperature (130-135°C) with the temperature gradually increased.
- The outside of the sesame balls are hard and dark while the inside is still raw or too soft. This is caused by frying the sesame balls at a high temperature too quickly and also not cooking the sesame balls long enough. It should take you around 10-11 minutes of total frying time.
- Sesame seeds falling off while frying. This is caused by not wetting the sesame balls prior to coating them in the sesame seeds or not packing the sesame seeds in tightly enough.
Storage Tips
These smiling sesame balls can be stored in an airtight container at room temperature for up to 5 days.
How to Reheat Smiling Sesame Balls
Pop them into an air fryer or oven and heat them between 325-350°F for about 8-10 minutes or until crispy again.
Similar Recipes
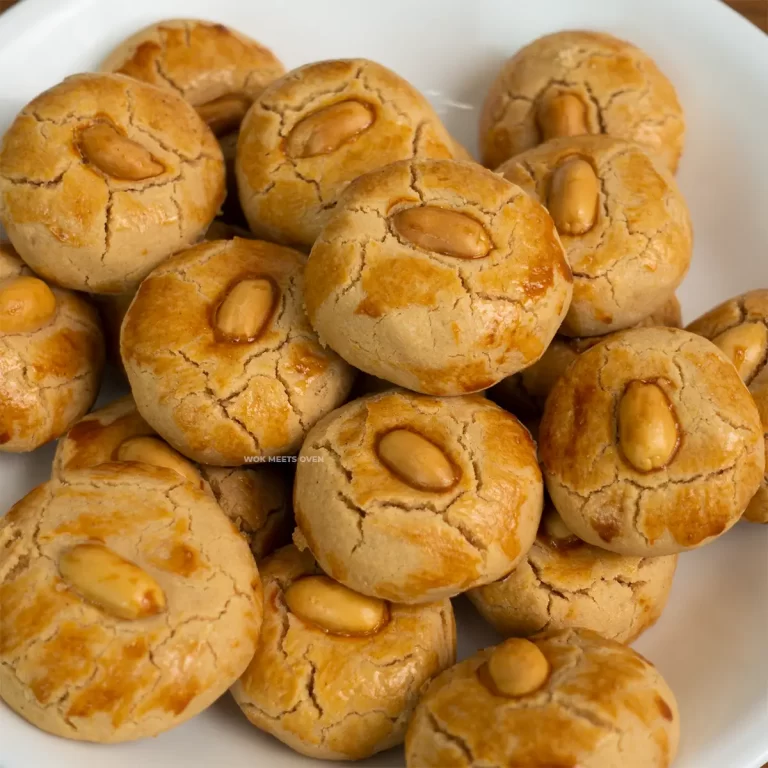
If you enjoy Chinese smiling sesame balls then you might also like fried sesame balls with mung bean filling, Chinese black sesame dessert soup, and Chinese peanut cookies.
Frequently Asked Questions (FAQs)
Can I Air Fry These Smiling Sesame Balls Instead of Frying Them?
No!
Can I Freeze These Smiling Sesame Balls?
I never tried it. You can probably try freezing the dough and then let it defrost before rolling it in the sesame seeds and frying them, or just divide them into dough balls and freeze them.
Why Isn’t the Skin of My Smiling Sesame Balls Cracking?
Your oil temperature might be too high too soon. Start off on a low temperature when first adding them to hot oil to fry.
Chinese Smiling Sesame Balls (笑口棗)
Equipment
- 1 Pot For frying
Ingredients
- 2-3 Cups White sesame seeds For coating dough balls
- 70 g White granulated sugar
- 1 Cup Water For dripping in dough balls
- 240 grams Cake flour
- 1 teaspoon Baking powder
- 1/4 teaspoon Baking soda
- 1/4 teaspoon Table salt
- 30 ml Cooking oil 2 Tablespoons
- 2 Extra large Eggs Roughly about 60g without the shell each
Instructions
- Add flour, baking powder, and baking soda into a bowl.
- Sieve it into a large mixing bowl.
- Next, add in your sugar and give it a quick mix.
- Add in your oil. Give it a quick mix.
- Then add in the eggs.
- Mix everything well together.
- Now, knead the dough until all of the ingredients are mixed well together and there are no more flour spots (about 1-2 minutes).
- Cover the dough and let it rest for 25 minutes.
- Then divide the dough into balls that weigh about 10g each. I highly suggest using a kitchen scale to weigh out each piece so that you get equally sized balls.
- Next, dip each dough ball into water and roll it in sesame seeds. You can also rub water onto the dough balls (my preferred method).
- Then pack the sesame seeds into the balls so that they don’t fall off by gently squeezing the balls.
- Cover the sesame balls and set them aside for now.
- Next, heat up a pot of oil until it reaches between 130°C-135°C. Make sure that there is enough oil to fully submerge the sesame balls.
- Once the oil temperature reaches between 130°C-135°C, add the sesame balls. Don’t overcrowd the pot, as you’ll need to move the sesame balls around.
- Then, turn off the stove. Yes, turn it off!
- Let the sesame balls slowly float to the top, then turn on the lowest setting.
- Let them fry for about 5 minutes on the lowest setting then increase the temperature to medium-low heat and fry for another 3-4 minutes and then finally increase the temperature to medium or medium-high heat and fry for another 1-2 minutes until golden brown. Total frying time should be approximately 10-11 minutes.
- Do not let it get too brown while frying on medium/medium-high heat; it will continue to cook and get darker once you remove it from the hot oil! Make sure to occasionally move the balls around in a circular motion using a spider strainer or some chopsticks while slightly pushing the balls back into the oil.
- Once done, remove them from the oil and let them cool down before serving.