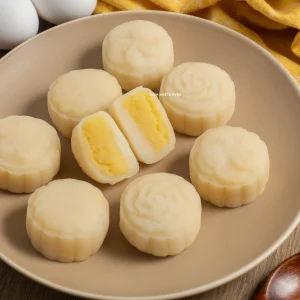
Snow Skin Mooncake with Custard Filling
Celebrate Mid-Autumn Festival with some custard filling snow skin mooncakes, a modern take on traditional baked mooncakes. These no-bake, chilled, soft & chewy snow skin mooncakes are filled with a creamy, rich, decadent custard filling that is perfect for family gatherings during the holiday season.
Equipment
- 1 Steamer or Wok
- 1 Mooncake Mold 50g
Ingredients
Snow Skin Dough
- 58 g Glutinous Rice Flour
- 58 g Rice Flour
- 32 g Wheat Starch
- 35 g Icing Sugar
- 6 g Milk powder
- 1/4 Teaspoon Table salt 1.5g
- 200 ml Milk (whole, 2%) Room temperature
- 20 g Condensed milk
- 30 g Vegetable Oil Add after steaming
Custard Filling
- 65 g Milk Powder
- 1/4 Teaspoon Table salt
- 35 g Wheat starch
- 115 ml Milk
- 40 g White granulated sugar
- 140 g Eggs Approximately 2.5 large eggs
- 50 g Unsalted melted butter
- 1 Teaspoon Vanilla extract
Dusting Moon Cakes
- 1 Tablespoon Cooked glutinous rice flour Approximately 15g
Instructions
Making the Filling
- In a large bowl, add in your milk powder, wheat powder, milk, eggs, melted unsalted butter, sugar, salt, and vanilla extract. Whisk and mix everything well together.
- Next, pour the filling mixture through a strainer onto a non-stick pan.
- Turn the heat on to low or medium-low heat while constantly stirring the filling with a spatula. Initially, the filling will remain very runny, but after it starts to heat up and cook, it will start to develop clumps. This process can take more than 5-10 minutes, depending on your stove. Be patient!
- Once you start to see it solidify and turn into clumps, turn the heat onto the lowest setting and continue mixing it. It will start to cook faster and faster now, so make sure that you’re constantly stirring it and monitoring it.
- Cook it until it turns into a paste that isn’t too wet nor too dry either. Don’t overcook it! It should form into a large custard paste that doesn’t stick to your spatula or the pan.
- Now remove the pan from the stove and transfer the custard to a bowl. Let it cool down and then cover it with plastic wrap and put it in the fridge to make it less sticky and easier to work with.
Making the Snow Skin
- In a large bowl add in your rice flour, glutinous rice flour, wheat starch, sugar, milk powder, salt, milk, and condensed milk. Mix everything well together.
- Pour the mixture through a strainer onto a large plate or bowl that will be used to steam it. You can cover the plate or bowl with a plate, aluminum foil or some plastic wrap if you’re worried about water dripping down onto the mixture or likewise, you can quickly tilt the lid to the side after steaming to let all of the water drip down the sides.
- Steam on medium high heat for 25 minutes.
- After steaming, remove it from the stove and add in your vegetable oil. Now make several cuts to the snow skin dough and then transfer it to a large bowl for kneading.
- Let it cool down for 1-2 minutes before kneading it as it will be very hot. I suggest wearing gloves to knead the dough as it will be very sticky.
- Now knead it until all of the oil has been absorbed and the dough becomes nice and smooth. Shape it into a round ball.
- Now place the dough on top of a kitchen scale and weigh it out and then divide it by 16. It should equal about 25g per a piece. If there is too much excess dough then just weigh out 16 pieces that are 25g and then discard the excess or if you have enough, you can make 1 more piece.
- Next, roll the pieces into balls and then cover the 16 pieces and set them aside.
Cooking Glutinous Rice Flour
- Add glutinous rice flour onto a saucepan or non-stick pan.
- Stir-fry it on low heat for about 5 minutes or until the color turns into a light beige color and you can smell an aroma coming from the cooked glutinous rice flour.
- Remove it from the heat and transfer it to a bowl for dusting the mooncakes later.
Assembling the Snow Skin Mooncakes
- Take the custard filling out of the fridge and weigh it out.
- Divide it into 16 pieces, roll them into balls, and then cover each piece. Each piece should weigh approximately 25g. If you have too much excess, save it for making an extra piece or just consume it as is. Do not exceed 26g per piece, as it will not fit when you try to mold it! I also recommend wearing gloves while rolling out the custard, as it will be sticky. It will be less sticky if you’re gentle while rolling the custard into balls.
- Now, while wearing gloves, take 1 piece of the dough and flatten it out. Spread the dough out until it’s about the size of your palm. You can use your palm on the opposite hand to press down onto the dough balls to flatten them out, and then, using two hands, slowly press onto the edges while rotating the snow skin to further expand it out.
- Next, place 1 piece of the custard filling in the center of the snow skin.
- Now, while using your thumb and index finger on one hand to hold the filling in the center, flip the dough with the filling over.
- Then, with your other hand, slowly grasp the snow skin and wrap it around the custard filling ball with the insides of your thumb and index finger in a downward motion, making sure not to let any air pockets develop.
- Then flip it over again and, using the insides of your thumb and index finger, slowly turn and pinch the top of the dough inwards to cover the custard filling while holding the bottom of the mooncake with your other hand.
- Once you get to the top, pinch the ends to seal it and press it back down onto the snowskin to fully seal it, or just rip off the excess dough at the tip. Roll it out into a round ball and then set it aside.
- Repeat for all of the other pieces. I recommend keeping the custard filling pieces chilled in the fridge and only taking 1-2 pieces out at a time; otherwise, they will start to become soft and sticky.
- Now using a brush, lightly brush some of the cooked glutinous flour onto your snow skin mooncakes, making sure to brush off any excess flour. You do not need a lot for this step! Adding too much will lead to white spots on your mooncakes that are full of glutinous rice flour that covers up the designs.
- Next, place the mooncake inside a 50g mooncake mold with the smooth side facing up. Make sure that you’re using a 50g mold and not something else!
- Now, press down onto the mooncake mold while holding the mold with your other hand on top of a piece of parchment paper. Hold the mold for about 12 seconds before releasing it. If the moon cake does not come off, then gently press down onto the mold again while slightly lifting up the mold off the parchment paper. It will naturally come off.
- Repeat these steps for all of the other pieces.
- Once done, place all of the snow skin mooncakes instead of an airtight container and let them chill in the fridge for at least 2 hours before eating them. I recommend placing a piece of paper towel on top of the mooncakes to prevent any condensation and water droplets from dropping back down into the snow skin mooncakes in the fridge.