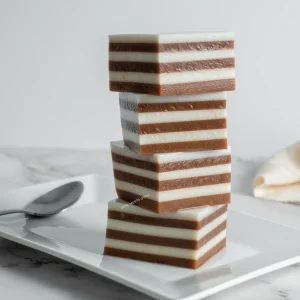
Milo Coconut Jelly
This Milo coconut jelly dessert is rich & smooth, chocolatey and malty, making them a great refreshing dessert to enjoy on a hot summer day. This recipe is super easy to make with only a few simple ingredients that you probably already have lying around in the house.
Equipment
- 2 Pots
Ingredients
Milo Layer
- 7 g Agar-agar powder
- 65 g White granulated sugar
- 80 g Milo powder
- 700 ml Water
Coconut Milk Layer
- 350 ml Water
- 350 ml Coconut milk
- 55 g White granulated sugar
- 7 g Agar-agar powder
- 1/8 tsp Table salt
Instructions
- Start by pouring the agar-agar powder and sugar onto a pot, followed by the water.
- Now using a whisk, mix the mixture evenly in the pot for about 30 seconds or so.
- Let it soak for about 10-15 minutes after whisking it with a whisk.
- In another pot repeat this process by pouring the agar-agar powder, sugar, and table salt, mixing it, and letting it soak in the water. You should have 2 pots in total. One is for the Milo layer and one is for the coconut layer.
- Now place the first pot on a stove, turn the stove on, and bring it to a boil. Then reduce the temperature to low and add in your Milo powder to the pot.
- Whisk the mixture to mix everything up and then let it simmer on low heat.
- Now place the second pot on a stove, turn on the stove, and bring the pot to a boil while whisking it.
- Once it boils, turn the stove down to low and pour in your coconut milk onto the pot.
- Continue mixing the coconut pot and allow it to simmer over low to medium-low heat.
- Now scoop out and weigh 200ml of the Milo mixture and pour it into a container. I recommend using a thick glass container as a plastic container may end up melting due to the hot liquid.
- You can pop out any bubbles that you see after pouring out the liquid if you'd like it to look smooth. Repeat this step for all layers.
- Allow it to solidify and cool down (Approximately 5-10 minutes).
- Then scoop out 200ml of the coconut mixture and pour it on top of the Milo layer on the container. I recommend pouring the coconut layer very close to the Milo layer to prevent the Milo layer from sinking down.
- Allow the coconut layer to solidify and cool down.
- Now repeat this process once again by pouring the Milo liquid on top of the coconut layer and vice versa.
- Repeat this process until you have 6 layers (200ml each).
- There will still be a little extra liquid left. This was done on purpose as some of the liquid will have solidified on the sides and edges of the pots and the extra liquid acts as a buffer to ensure that you will have enough liquid to create 6 even layers. You can pour out the extra liquid onto another small container if you’d like or just discard it.
- For the last coconut layer, I recommend using a sieve to remove any impurities and bubbles when pouring it into the container. Also, use a toothpick and spoon to pop and scoop out any bubbles you see on the surface if you want to have a smooth surface.
- Once you have poured out the last layer, allow the jelly to solidify and cool down.
- Then put the container in the fridge and allow at least 4 hours for the jelly dessert to cool down and harden before serving the jelly but ideally overnight is best.