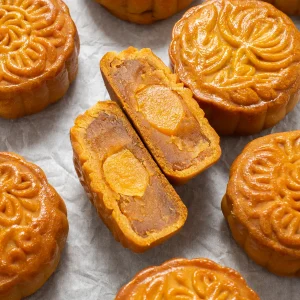
Lotus Seed Paste Mooncakes with Salted Egg Yolk
Indulge in some lotus seed paste salted egg yolk mooncakes this Mid-Autumn Festival. These mooncakes are rich, moist, and fragrant with a sweet and savory center. Once you learn how to make this classic pastry, you’ll never want to buy mooncakes again!
Equipment
- 1 Steamer or Wok
- 1 Pot
- 1 Mooncake Mold Make sure to use 100g mooncake molds
- 1 Oven
Ingredients
Filling
- 185 g White lotus seeds
- 125 g White granulated sugar
- 865 ml Water
- 50 g Maltose
- 175 g Vegetable oil
- 12 Salted egg yolks
- 1/2 Tablespoon Chinese Rose wine
Dough
- 240 g Cake flour
- 130 g Golden syrup
- 1 Tablespoon Lye water 15ml
- 45 ml Vegetable oil
- 1/2 teaspoon Table salt
Egg wash
- 1 Egg yolk
- 1 teaspoon Milk
For dusting mooncakes
- 1 Tablespoon Cake flour
Instructions
Making the Lotus Paste
- In a large bowl, add in your dried lotus seeds, and then fill the bowl with enough water to cover all of the lotus seeds plus an extra 2 inches above the lotus seeds.
- Allow the lotus seeds to soak overnight in the fridge.
- The next day, strain out all of the water and give the lotus seeds a quick rinse.
- Now open the lotus seeds and take out the green stem in the core if you see any. If you don’t remove the green stems, they will make your lotus seed paste very bitter. You can save these green stem cores for brewing tea if you’d like.
- Once done, give the lotus seeds another quick rinse and then add them to a pot with water. Boil the lotus seeds on medium heat in the pot until there is about 1/2 inch of water above the lotus seeds. Now turn down the heat to medium-low/ low-heat and continue cooking the lotus seeds until they become soft. This will take a while, so be prepared. It took me about an 1 hour to cook the lotus seeds over the stove.
- To check when the lotus seeds are ready, scoop up 1-2 lotus seeds and press down on them with your finger. The lotus seed should easily break and become mushy if it has reached the right softness level.
- Once done, remove the pot from the stove and allow it to cool down.
- Now transfer all of the contents of the pot, including the leftover water to a blender.
- Blend everything together until the lotus seeds become a smooth paste. If you find the lotus paste too thick, then add an additional 1-2 Tablespoons of water to the blender and continue blending it until nice and smooth. It should have a consistency similar to peanut butter.
- Once done, transfer the contents into a bowl and set the lotus paste aside.
- Now, add 3 tablespoons of cooking oil along with your white sugar to a non-stick pan and cook it over medium-low heat while constantly stirring the pan. Continue cooking the mixture until all of the sugar has melted and caramelized. You should have a nice brown color syrup in the pan.
- Now, add in your blended lotus paste to the pan and mix everything well together with the oil and caramelized sugar.
- Next, add in your leftover cooking oil in 3 stages. Add about a 1/3 of it into the pan and mix it well together with the lotus paste. Once all of the oil has been absorbed, add in another 1/3 of it and mix it well with the lotus paste until all of it has been absorbed. Then, add in the remaining 1/3 of oil and repeat the process.
- Once all of the oil has been absorbed by the lotus paste, add in your maltose and mix everything well together.
- Continue cooking this mixture over medium-low heat until most of the water has evaporated and the lotus paste doesn’t stick to your spatula or pan anymore. It should resemble one large piece of filling. Do not overcook the filling, or it will become dry!!!
- Remove the filling from the stove and pour it into a bowl or container.
- Let it cool down, and then cover it with plastic wrap and place it in the fridge to chill.
Making the Mooncake Dough
- In a large bowl, add in your golden syrup and cooking oil. Mix everything well together.
- Next, add in your lye water and table salt and mix everything well together.
- Now sift in your flour in 3 stages to the bowl while mixing everything well together.
- Finally, knead the dough until you no longer see any flour spots, and it becomes one piece of dough, about a minute of kneading time. Then cover the dough and let it rest for 1 hour at room temperature.
Preparing the Salted Duck Egg Yolks
- Add the salted egg yolks to a bowl or plate.
- Brush or spray some Chinese rose wine onto the salted egg yolks.
- Steam the egg yolks for 7-8 minutes after the water is boiling in a pot on high heat.
- Once done, remove the salted egg yolks from the stove and allow them to cool down.
Assembling the Mooncakes
- Now take out your lotus paste filling.
- Take 1 piece of the steamed salted egg yolk and weigh it.
- Now add the lotus paste filling to the scale as well until the total weight equals 65g. For example, if the salted egg yolk weighs 11g then add 54g of the lotus paste filling to reach a total weight of 65g.
- Repeat this process for the rest of the egg yolks and lotus paste filling. You should end up with 12 pieces, each weighing 65g in total for each set.
- Now take each piece of lotus seed paste filling and roll it out into a ball. Cover the filling and set it aside.
- Next, make a large hole in the lotus paste balls and add the salted egg yolk inside.
- Then, wrap the lotus paste filling over the egg yolk and roll it into a ball. Once done, place all of the filling balls inside the fridge for later use.
- Next, divide the mooncake dough into 12 pieces that weigh 35g each.
- Now roll the mooncake dough into a round ball and then flatten the dough and shape it into a round wrapper about the size of your palm.
- You can place the round dough on your palm and then, using the palm of your opposite hand, press down onto the round ball until it resembles a round wrapper.
- Next, take out the filling from the fridge and place one piece of the filling in the center of the dough wrapper.
- Now, flip the dough and filling over and hold the wrapper and filling in place with one hand.
- Then, with your opposite hand, grab the dough wrapper and gently push the wrapper down and inwards with the insides of your thumb and index finger, making sure not to leave any air pockets between the wrapper and filling.
- Next, flip the dough and filling over one more time.
- Now, using your thumb on one hand to hold the filling in place and rotating it with the rest of your fingers, gently push up and inwards with the insides of your index finger and thumb on the opposite hand to seal the dough.
- Continue pushing up and inwards, and then pinch the top to seal the mooncake.
- Gently roll it out once again into a round ball and then cover it and set it aside. Repeat these steps for all the other pieces.
- Now, grab one of the mooncake balls and lightly brush some cake flour onto it. This will help prevent the mooncake molds from sticking to the mooncakes. Do not add a lot of cake flour to the mooncakes!
- Next, grab your mooncake mold (100g) and place the mooncake ball into the mooncake mold. It should fit. If it doesn’t, then slowly pinch the sides of the mooncake ball while rotating it until the ball fits the mold perfectly.
- Place the mooncake ball and mold onto a piece of parchment paper and press down onto the mooncake mold with one hand while holding the mooncake mold in place with the other hand.
- Keep it pressed for about 10-12 seconds before finally letting it go. If the mooncake doesn’t come off the mold, then press down again onto the mold while lifting up the mold a few cm off the parchment paper. The mooncake will naturally come off.
- Repeat this for all the other pieces.
Baking the Mooncakes
- Pre-heat your oven to 330°F (165°C).
- Once the oven is hot enough, spray some water onto the mooncakes and bake them for 8 minutes at 330°C (165°C).
- Take the mooncakes out of the oven and let them rest for 3-5 minutes.
- While waiting for the mooncakes to cool down, make an egg wash by whisking 1 egg with a teaspoon of milk.
- Apply a light egg wash to the top and top sides of the mooncakes. Make sure the mooncakes are not hot while applying the eggwash; otherwise, the eggwash will get cooked immediately. Make sure not to brush a lot of egg wash on the mooncakes; otherwise, the egg wash will cover up the design when baked.
- Once done, put the mooncakes back into the oven and bake for another 8 minutes.
- Take it out again and let it rest for another 3-5 minutes.
- Apply the egg wash again. Remember, only a very light coating of egg wash!
- Bake for another 10-12 minutes or until the top has browned a bit.
- Once done, take the mooncakes out of the oven and allow them to cool down. They are not ready to be eaten yet!
- Once the mooncakes have fully cooled down, place them into an airtight container at room temperature and let them rest at room temperature for 2-3 days. During this time, the mooncakes will become softer, they will smell more aromatic, and the color will become darker and more golden.
- After this resting period, the mooncakes can be eaten. Enjoy
Notes
Note: You need a kitchen scale for this recipe! No cups! That’s because you need to be precise to get the right ratio of filling to dough to make the mooncakes, otherwise you will end up with too much or too little filling or dough. Another thing to keep in mind, the mooncake molds only fit a certain size, in this case 100g. If you go over 100g then your mooncake balls will not fit into the mold. Don’t guess, get a kitchen scale!
You can cook the lotus seed paste the night before. As this is a time-consuming process, I suggest cooking the lotus seed paste the night before and then putting it in the fridge. When you’re ready to use the filling, simply take it out of the fridge.
Do not eat the mooncakes immediately after they are finished baking. They will be dry and hard. They need to rest for 2-3 days to develop the flavor, aroma, color, and softness typical of mooncakes.