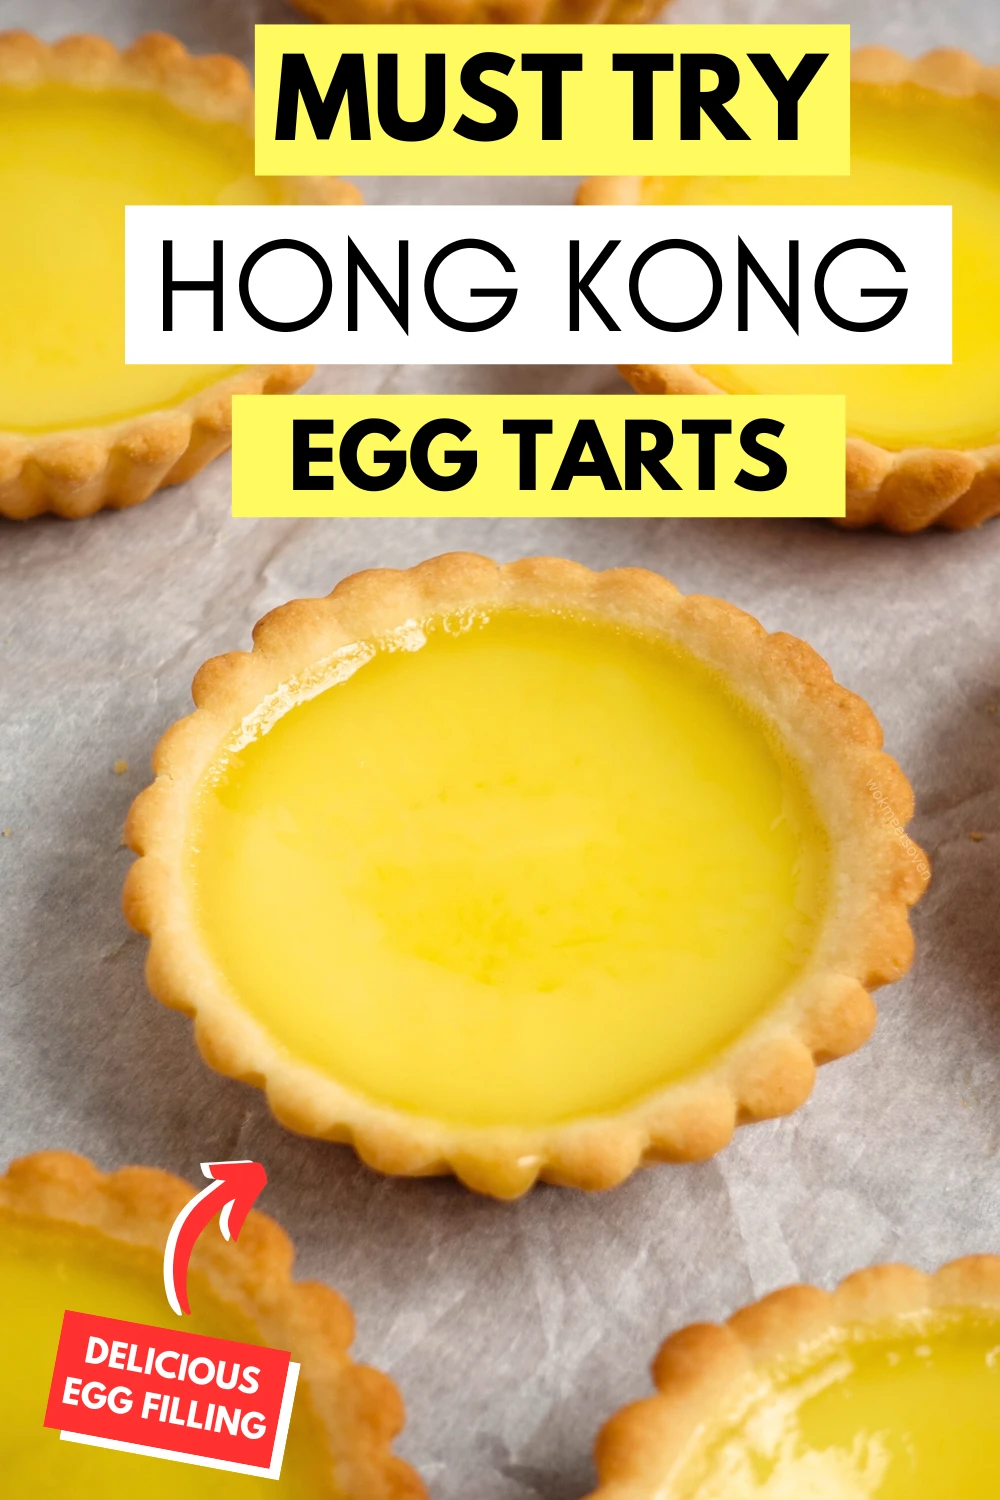
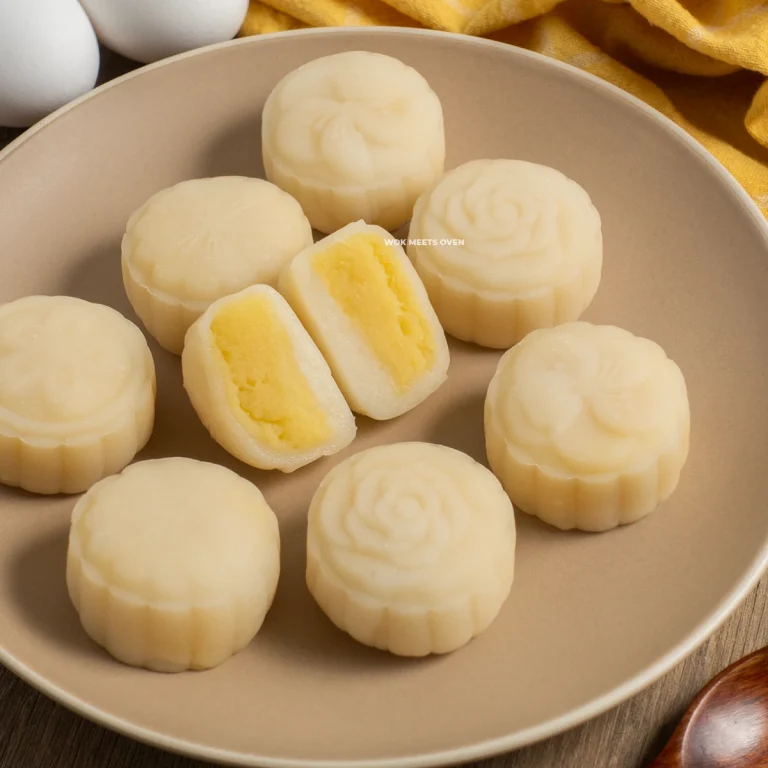
Easy Hong Kong Style Egg Tarts
Hong Kong-style egg tarts (dan tat) are Hong Kong’s take on traditional egg tarts. These Chinese egg tarts have a buttery shortbread cookie shell with a flavorful custard-like egg filling that just melts in your mouth!

What Is a Chinese Egg Tart
Chinese egg tarts, also known as Hong Kong (HK) style egg tarts or 蛋撻 in Cantonese (pronounced as dan tat), are a popular baked Asian custard tart popularized in Hong Kong and southern China, later spreading all throughout the globe.
Nearly every Chinese bakery shop that you go to nowadays will sell HK-style egg tarts.
The Cantonese egg tarts come in 2 varieties:
- A cookie pastry shell
- A puff pastry shell
The filling is virtually the same, with the only difference being the pastry shell.
There is also one more version, the Portuguese egg tart that hails from Macau, but we’ll get to that in a minute.
This popular dessert is sometimes ordered during dim sum (Chinese morning tea time) at Chinese restaurants. At these dim sum restaurants, the dim sum egg tarts will typically come in the puff pastry version and be slightly smaller than the ones that you see being sold at Chinese bakeries.
The egg tarts are known for their simple yet tasty soft, silky egg filling that is housed inside the pastry shell. The cookie pastry shell is soft and buttery and just melts inside your mouth, while the puff pastry version is crispy and crunchy.
People in Hong Kong line up for hours just to buy these traditional Chinese egg tarts, so that should give you an indication as to how delicious and popular they are.
Chinese Egg Tart Origin
According to the South China Morning Post, Chinese egg tarts were first introduced to China in the 1920s, in the city of Canton (modern day Guangzhou) by the British. It was here that Chinese chefs modified it and later introduced it to Hong Kong.
In fact, if you look at a British custard tart, you’ll notice a lot of similarities in its appearance.
The Portuguese-style egg tart, on the other hand, which was popularized in Macau, looks a lot different.
What Is the Difference Between Portuguese and Hong Kong Egg Tarts?
If you’re a fan of egg tarts, then no doubt you’ve come across both Portuguese-style egg tarts, also known as pastel de nata, and Hong Kong-style egg tarts.
While both pastries are egg tarts, there are a number of differences between them:
Portuguese egg tarts:
- Very crispy and flaky puff pastry egg tart shell
- Very sweet, rich, creamy, dense egg filling
- Caramelization and dark spots on top of the egg filling.
Hong Kong egg tarts (cookie crust version):
- Buttery cookie-like pastry texture that just crumbles and melts in your mouth
- Smooth, soft, silky egg filling
- Smooth, bright golden yellow surface on top of the egg filling
Hong Kong egg tarts (puff pastry version):
- Crispy, flaky yet soft puff pastry egg tart shell
- Smooth, soft, silky egg filling
- Smooth, bright, golden yellow surface on top of the egg filling
Both versions of HK egg tarts have virtually no difference in their egg filling. The only difference is in the pastry that is used to house the egg custard filling.
What Do Chinese Egg Tarts Taste Like
The cookie version of Chinese egg tarts’ shell tastes like a buttery, rich shortbread cookie, while the egg filling tastes like a sweet, soft egg custard.
While the puff pastry version of Chinese egg tarts’ shell is extra crispy and flaky, with the same sweet, soft egg custard filling.
Hong Kong Egg Tart Ingredient Notes

Eggs: The star of the show and the reason why you’re here. The eggs are used as the main ingredient for our egg custard filling. A good Hong Kong custard tart should have a bit of an egg taste when you bite into it. I’m using large eggs for this recipe, which weigh around 60g. You can use whatever eggs you prefer for this recipe, such as fancy omega-3 eggs, free-range eggs, white and brown colored eggs, organic, etc. I probably don’t need to say this, but make sure they are chicken eggs and not something else like a giant ostrich egg or quail eggs 🤦♂️.
Evaporated milk: This adds a bit of creaminess to the egg tart pastry.
Water: You can use tap water or distilled water. It doesn’t matter for this recipe.
Unsalted butter: Butter is used to make the egg tarts flaky and buttery. Make sure to use unsalted butter.
Bread flour: The higher gluten content in bread flour will help make our egg tart shells a little more crispy.
Cake flour: To balance out the crispiness on our egg tart shells, we’re using cake flour, which will result in a softer, more tender tart crust.
Icing sugar: Used for sweetening the cookie dough. I used icing sugar instead of white granulated sugar to avoid having a coarse texture in our cookie dough.
Milk: You can use 1%, 2%, or whole milk. I don’t recommend skim milk for this recipe.
White granulated sugar: Used for sweetening the egg custard filling.
Substitutions
- Eggs: I’m using regular eggs (the cheapest kind), but you can substitute it with whatever eggs you prefer, like free-range eggs, omega-free, etc. Just don’t use any weird eggs like ostrich eggs, OK?
- White granulated sugar: You can substitute it with brown sugar or rock sugar.
- Bread flour: If you don’t have any, then you can substitute it with all-purpose flour.
- Cake flour: If you don’t have any, then you can substitute it with all-purpose flour.
- Milk powder: If you don’t have milk powder, then you can substitute it with Coffee Mate.
How to Make Hong Kong Egg Tarts
Today, for my Hong Kong egg tart recipe, we’re going to make the cookie pastry version of Hong Kong egg tarts. The cookie version is a lot simpler and quicker compared to the puff pastry version.
There’s no complicated folding the dough over itself and re-rolling the dough after placing it in the fridge, unlike a Hong Kong egg tart puff pastry recipe.
We’re just going to make our dough, our filling, and then bake!
This easy Chinese egg tart recipe is perfect for beginners or anyone who craves the cookie crust version of Hong Kong egg tarts.
So let’s get started!
Making the dough:
- Start by adding in your unsalted butter + powdered sugar into a stand mixer mixing bowl. Cream the butter and sugar together until everything is well mixed together (approximately 1-2 minutes).


- Now add in your evaporated milk and then mix everything together until the milk is incorporated with everything (approximately 1-2 minutes).


- Now add in your milk powder, bread flour, and cake flour to the bowl. Mix everything together until you don’t see anymore white flour spots (about 2-3 minutes). Don’t overmix the dough, otherwise it will become tough!


- After mixing the dough, take it out of the stand mixer and wrap it in some plastic wrap, and set it aside. Let the dough rest for 15 minutes.

- After 15 minutes have passed, weigh out the dough and then divide it into 10 pieces (approximately 25g per piece).


- Now, take each piece of dough and roll it into a round ball. Sprinkle a little bit of flour on the dough balls so they don’t stick together, and then cover them with some plastic wrap to prevent them from drying out.


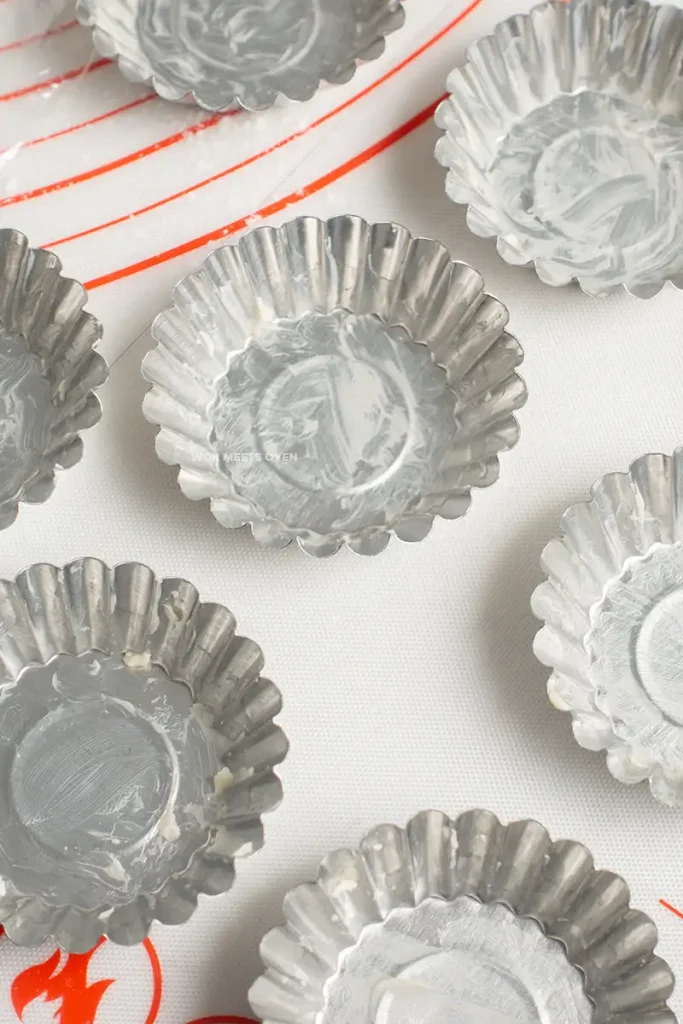
- Now, grab some cold or room temperature butter and grease your egg tart molds so that the dough won’t stick to them after baking, and then set the egg tart molds aside. I’m using 7-7.5cm egg tart molds in this recipe here. If you use larger ones, then your egg tart shells will be thinner!

- Next, sprinkle a little flour on your countertop.
- Then, grab 1 piece of the dough balls and flatten them on top of the flour. Place the dough in the middle of the egg tart molds.


- Now press down with each thumb while rotating the tart mold in either a clockwise or counterclockwise motion, while slowly pushing up and spreading out the dough until it covers the whole tart mold. The top of the dough should be only slightly higher than the top edge of the tart molds.


- When done shaping all of the tart molds with the dough, place them onto a baking tray and then place the tray in the fridge.


Egg filling:
- While our dough is cooling down in the fridge, prepare the egg filling by adding white granulated sugar and water into a saucepan and mixing everything well together.

- Cook the sugar and water mixture on a stovetop until all of the sugar has melted. There’s no need to cook it until it is boiling. Once done, turn off the stove and remove the saucepan from the stove top.

- Now add in the milk while stirring the sugar water mixture. Let the mixture cool off until it’s lukewarm.


- Now crack your eggs into a bowl and whisk them. Whisk the eggs until they are well mixed together.


- Next, slowly whisk the eggs while pouring the milk sugar water mixture into the bowl.

- Once everything is well mixed together, pour the egg filling mixture through a sieve into a cup or jug.


- Now, preheat your oven to 350°F (180°C).
- Once your oven is almost ready, take out the egg tarts. Now, give the egg filling a quick stir, and pour the egg filling into each egg tart until it is around 80% filled. Don’t overfill it as the eggs will expand and rise during baking.


- If you see any bubbles on the surface of your egg tarts, I suggest using a toothpick or a lighter to pop the bubbles to ensure you have a smooth surface on your egg tarts after they are finished baking.
- Once your oven is ready, bake the egg tarts in the oven on the middle rack at 350°F (180°C) for 22-23 minutes or until the egg filling is fully cooked.
- Once the egg tarts are finished baking, let them cool down before removing them from the egg tart mold. They will come off easily once the egg tarts have cooled down.


Tips
- Apply some butter onto the egg tart molds prior to baking them to make it easier to remove the egg tarts after baking.
- Make sure to sieve the egg filling mixture before pouring it onto the egg tart shells. This will give the egg filling a smooth, clean look.
- To check and see whether or not your egg tarts are done baking, gently shake the baking tray while it’s in the oven and look and see whether or not the egg tarts wiggle. If you see the egg filling wiggling a lot, then it’s not ready. If it doesn’t wiggle or only slightly wiggles in the center, then the egg tarts are ready. You can also stick a toothpick into the egg filling and see whether or not it comes out clean to check for doneness.
- After baking the egg tarts, don’t immediately remove them from the egg tart molds. Let the egg tarts cool down a bit, and then they will be easier to remove from the egg tart molds.
Common Mistakes Beginners Make
- Not pouring the egg filling through a sieve prior to baking the egg tarts. This will cause the surface to develop a lot of bubbles and impurities.
- Over-mixing the dough makes the egg tarts taste very tough. Do not overmix the dough!
- Not checking to see whether or not your egg tarts are done baking by shaking the baking tray slightly while the egg tarts are in the oven, leading to under-baked egg tarts.
- The egg tart filling swells up really high during baking. This is caused by using a very high baking temperature to bake the egg tarts. Your oven temperature is too high, and you will need to reduce the temperature.
How to Store Chinese Egg Tarts
The egg tarts can be stored in the fridge in an airtight container for up to 5 days.
How to Reheat Chinese Egg Tarts
To reheat the egg tarts, place them in the microwave and heat them until warm. Likewise, you can place them in an air fryer or oven and reheat them at 325°F (165°C) for about 5-6 minutes or until the egg tarts are hot.
Other Recipes That Go Great With Egg Tarts
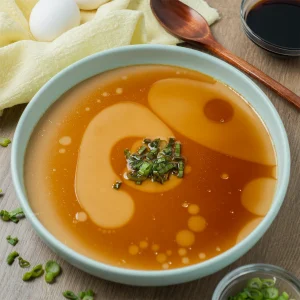
While Chinese egg tarts can be eaten alone, I recommend pairing them with a nice cold beverage like my homemade Chinese soy milk or some Chinese steamed egg pudding.
Frequently Asked Questions (FAQs)
Can You Freeze Chinese Egg Tarts?
You can freeze the dough used in this recipe for up to 3 months. When you’re ready to make the egg tarts, just let the dough thaw at room temperature and prepare the egg filling. Fill the egg tart shells with the egg filling and bake as usual.
What Size Egg Tart Molds Do I Use for This Recipe?
For this recipe, I used egg tart molds that measured around 7-7.5cm. If you use larger ones, then your egg tart shells will become thinner, and likewise, smaller egg tart molds will produce thicker egg tart shells.
You should adjust accordingly the amount of dough you add based on the size of your egg tart molds, or leave it as is with the expectation that they will be slightly thinner/thicker based on your egg tart mold.
How Do I Check Whether or Not My Egg Tarts Are Done Baking?
Gently shake the baking tray after the egg tarts are done baking and see whether or not the egg filling wiggles or not. They should either slightly wiggle in the center or be fully solidified. If you see them wiggle a lot or appear runny, then they are not ready yet.
Likewise, you can also stick a toothpick into the egg filling and see if the egg filling is ready. The toothpick should come out clean if they are ready.


If the egg tarts are not ready, then add a few more minutes of baking time until the filling has solidified. Make sure to keep an eye on them as it’s really easy to overcook them at this time!
Why Are My Egg Tarts Swelling Up in the Center When Baking?
Your oven temperature is too high! Reduce the oven temperature when baking the egg tarts.
Do Chinese Egg Tarts Need to Be Refrigerated?
Yes, the Chinese egg tarts should be refrigerated if you don’t intend to eat them that day.
How Long Do Chinese Egg Tarts Last?
These homemade Chinese egg tarts can last for up to 5 days in the fridge when stored in an airtight container.
Do Chinese Egg Tarts Have Dairy?
Yes, evaporated milk and regular cow’s milk are used in the recipe. If you’re lactose intolerant, then you can try substituting it with a plant-based version such as coconut evaporated milk and soy milk.
Other Recipes You’ll Love
- Chinese Steamed Egg Pudding Dessert
- Vietnamese Puff Pastry Meat Pies (Bánh Pâte Sô)
- Chinese Coconut Cream Buns
- Chinese Coconut Pudding
You can pin this image

Easy Hong Kong Style Egg Tarts
Equipment
- 1 stand mixer
- 1 Oven
- 10 Egg Tart Molds
Ingredients
Dough
- 90 g Unsalted butter Room temperature, cut into small cubes20
- 20 g Icing sugar
- 10 g Milk powder
- 10 ml Evaporated milk
- 65 g Bread flour
- 65 g Cake flour
Egg filling
- 100 ml Water
- 80 g White granulated sugar
- 90 ml Milk (cold) 2%, whole
- 2 Large Egg
Instructions
Making the dough
- Start by adding in your unsalted butter + powdered sugar into a stand mixer mixing bowl. Cream the butter and sugar together until everything is well mixed together (approximately 1-2 minutes).
- Now add in your evaporated milk and then mix everything together until the milk is incorporated with everything (approximately 1-2 minutes).
- Now add in your milk powder, bread flour, and cake flour to the bowl. Mix everything together until you don’t see anymore white flour spots (about 2-3 minutes). Don’t overmix the dough, otherwise it will become tough!
- After mixing the dough, take it out of the stand mixer and wrap it in some plastic wrap, and set it aside. Let the dough rest for 15 minutes.
- After 15 minutes have passed, weigh out the dough and then divide it into 10 pieces (approximately 25g per piece).
- Now, take each piece of dough and roll it into a round ball. Sprinkle a little bit of flour on the dough balls so they don’t stick together, and then cover them with some plastic wrap to prevent them from drying out.
- Now, grab some cold or room temperature butter and grease your egg tart molds so that the dough won’t stick to them after baking, and then set the egg tart molds aside. I’m using 7-7.5cm egg tart molds in this recipe here. If you use larger ones, then your egg tart shells will be thinner!
- Next, sprinkle a little flour on your countertop.
- Then, grab 1 piece of the dough balls and flatten them on top of the flour. Place the dough in the middle of the egg tart molds.
- Now press down with each thumb while rotating the tart mold in either a clockwise or counterclockwise motion, while slowly pushing up and spreading out the dough until it covers the whole tart mold. The top of the dough should be only slightly higher than the top edge of the tart molds.
- When done shaping all of the tart molds with the dough, place them onto a baking tray and then place the tray in the fridge.
Egg filling
- While our dough is cooling down in the fridge, prepare the egg filling by adding white granulated sugar and water into a saucepan and mixing everything well together.
- Cook the sugar and water mixture on a stovetop until all of the sugar has melted. There’s no need to cook it until it is boiling. Once done, turn off the stove and remove the saucepan from the stove top.
- Now add in the milk while stirring the sugar water mixture. Let the mixture cool off until it’s lukewarm.
- Now crack your eggs into a bowl and whisk them. Whisk the eggs until they are well mixed together.
- Next, slowly whisk the eggs while pouring the milk sugar water mixture into the bowl.
- Once everything is well mixed together, pour the egg filling mixture through a sieve into a cup or jug.
- Now, preheat your oven to 350°F (180°C).
- Once your oven is almost ready, take out the egg tarts. Now, give the egg filling a quick stir, and pour the egg filling into each egg tart until it is around 80% filled. Don't overfill it as the eggs will expand and rise during baking.
- If you see any bubbles on the surface of your egg tarts, I suggest using a toothpick or a lighter to pop the bubbles to ensure you have a smooth surface on your egg tarts after they are finished baking.
- Once your oven is ready, bake the egg tarts in the oven on the middle rack at 350°F (180°C) for 22-23 minutes or until the egg filling is fully cooked.
- Once the egg tarts are finished baking, let them cool down before removing them from the egg tart mold. They will come off easily once the egg tarts have cooled down.

These tastes just like the ones in HK! Please make coconut tarts next!
I’m glad you like the recipe. Keep an eye out for my next batch of recipes. It might include coconut tarts 😉