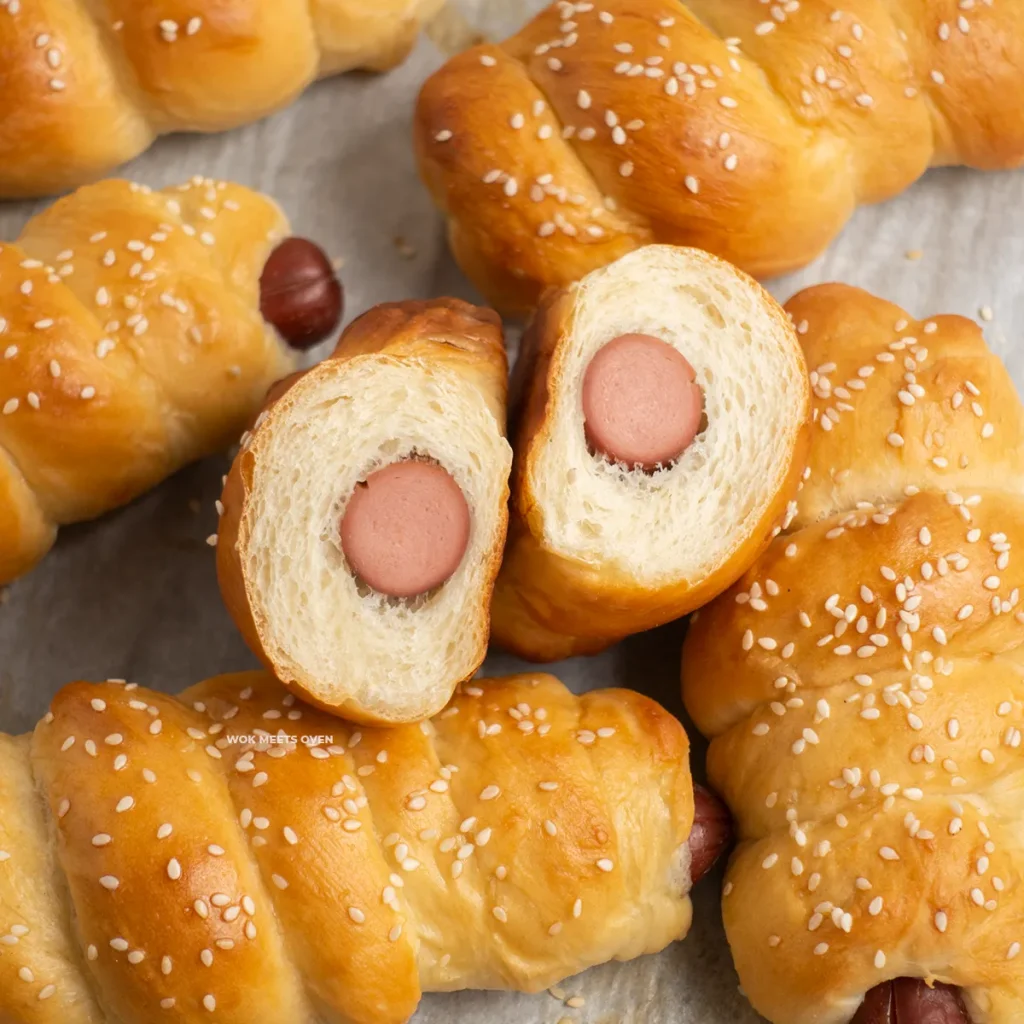
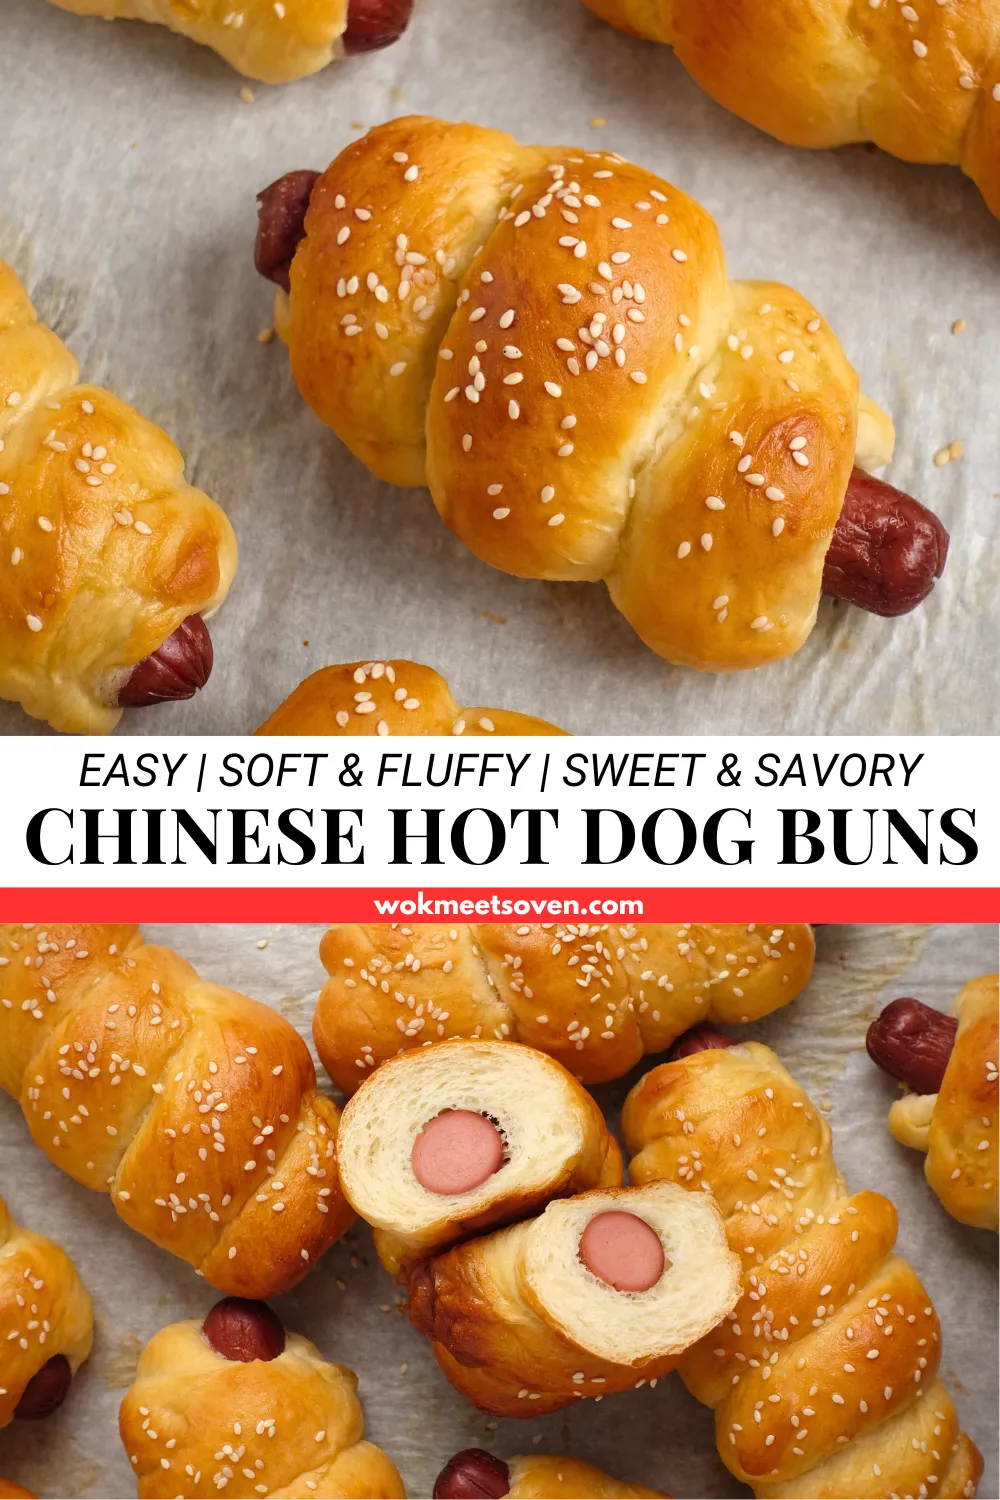
Chinese Hot Dog Buns Recipe
Soft and fluffy, sweet and savory, these Chinese hot dog buns are a classic from Chinese bakeries that you can now make at home.
The blog post was updated on July 2, 2025
What Are Chinese Hot Dog Buns?
I remember as a child, my father used to take me to the local Chinatown bakery and buy me these Chinese hot dog buns to eat for lunch or breakfast.
At around $1 a piece, they were considered a bargain and were good enough to keep me satiated for a few hours.
I have many fond memories of these buns growing up, and I’m sure many of you guys also share the same memories as me.
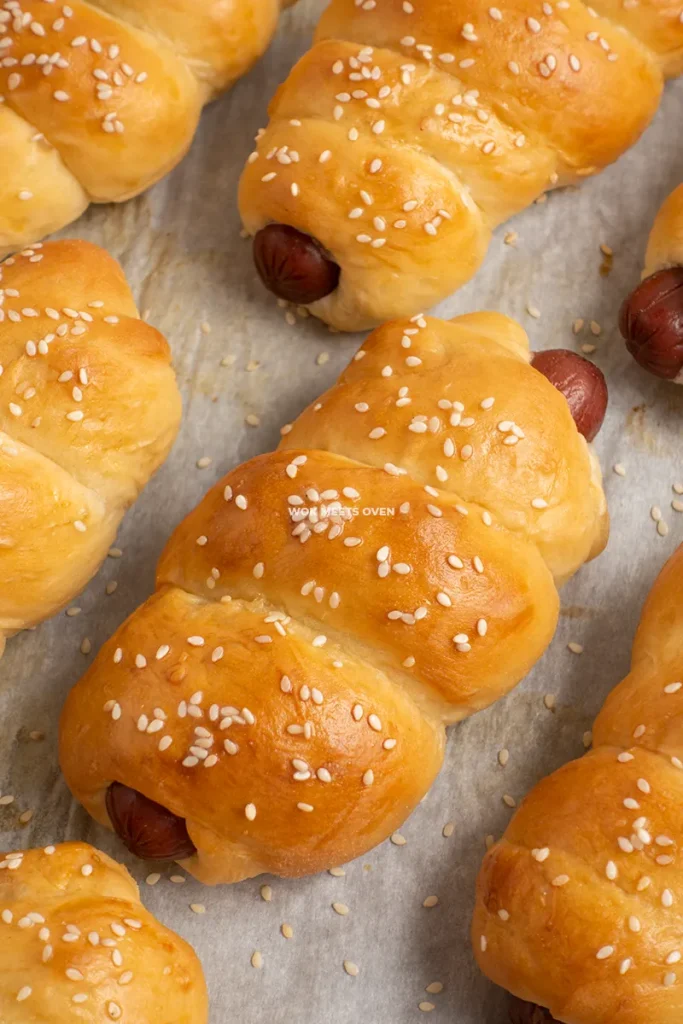
These Chinese hot dog buns, also known as Hong Kong hot dog buns, are soft and savory, with just the right amount of sweetness thrown in to round everything out.
Compared to Western-style hot dog buns, Chinese-style buns tend to be on the sweeter side, which I tend to enjoy more as it balances everything out. You get both saltiness from the hot dogs that is encircled by the sweetness of the hot dog buns, and to finish things off, usually these buns are either topped with toasted sesame seeds to add a nice little crunch to it or some bakeries will opt for some mayonnaise and parsley as a topping on top, further elevating it’s flavour.
Regardless, I think you’ll enjoy this Chinese hot dog bun recipe as much I do! Here’s what you’ll need to make these Chinese hot dog buns.
Chinese Hot Dog Buns Ingredient Notes
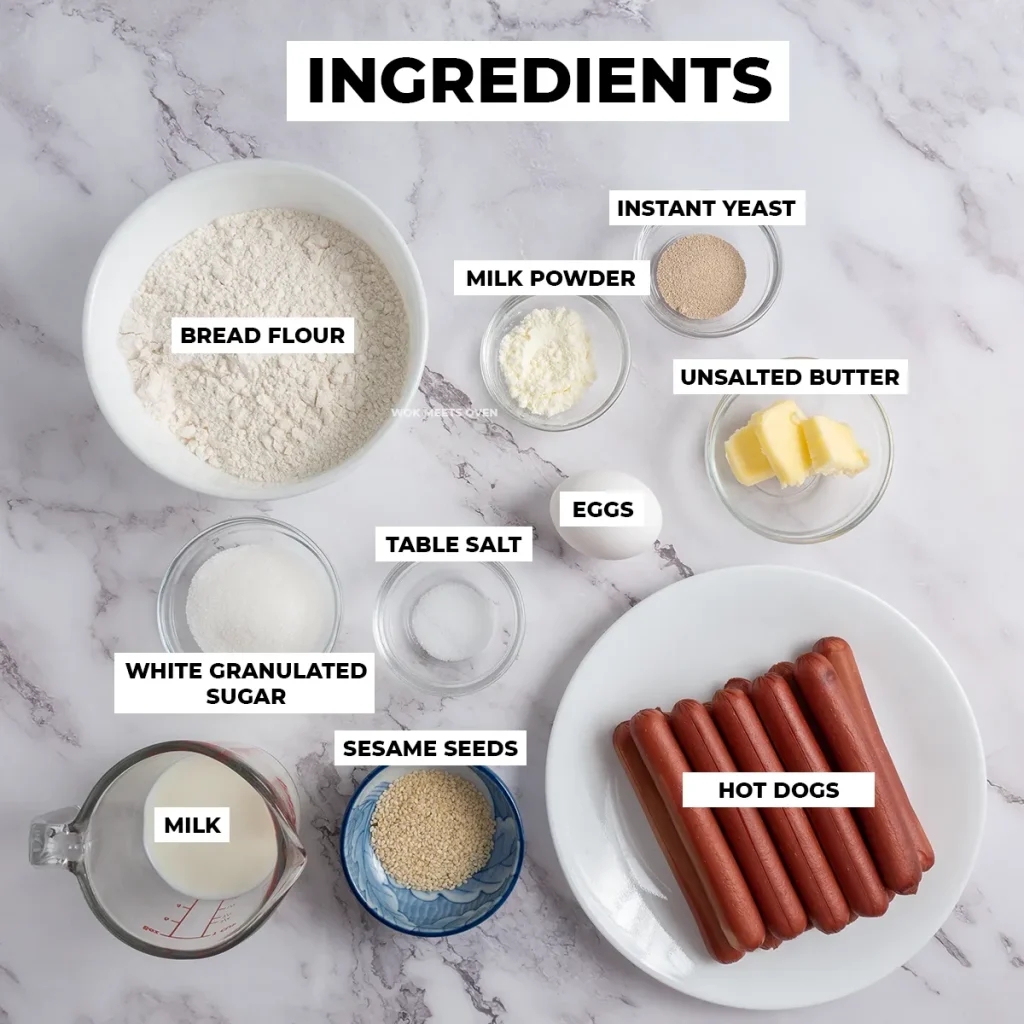
Hot dogs: You can use whatever kind of hot dogs you prefer. I recommend using some high-quality hot dogs for the best taste.
Bread flour: Bread flour makes our buns extra chewy due to the higher protein content, making them perfect for making these buns.
Milk: You can use 1%, 2%, or whole milk for this recipe. Even skimmed milk works.
Milk powder: Adds an extra hint of milk flavor to our buns.
Melted butter: Makes our buns extra buttery and rich.
Substitutions
- Bread Flour: If you don’t own bread flour, you can opt to use all-purpose flour. The buns will be slightly less chewy due to the lower protein content; however, they still taste great! Do not use cake/pastry flour with this recipe, or you will get a very cake-like texture.
- Hot dogs: Feel free to substitute hot dogs with whatever hot dog protein you enjoy, such as chicken, pork, beef, or a mixture of beef and pork. You can even use vegetarian hot dogs as well!
- Milk: If you’re lactose intolerant, then you can opt for a plant-based type of milk as almond milk or oat milk. You can also just use water in place of milk.
- Table salt: You can substitute it with sea salt or kosher salt. You will need to adjust the amount of salt though, as this recipe has only been tested with table salt.
How to Make Chinese Hot Dog Buns
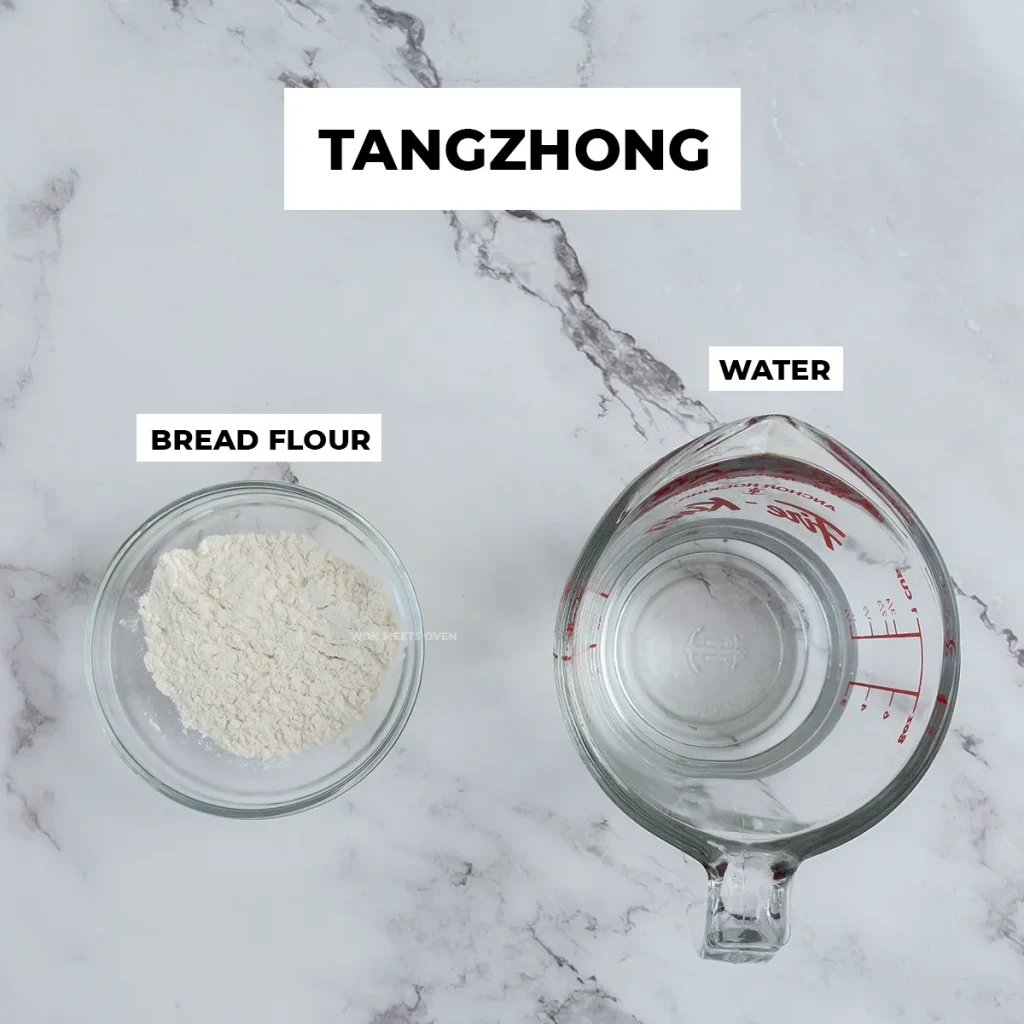
Making the Tangzhong
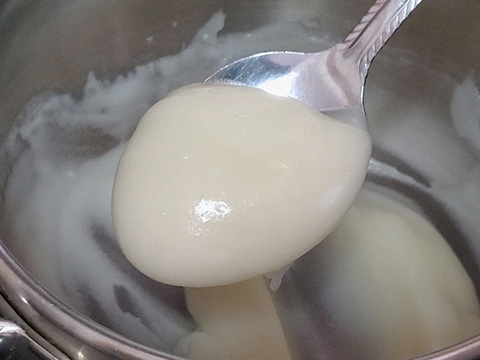
- To make the Tangzhong, in a small saucepan, add your water and bread flour and mix everything well together. Heat this mixture over low heat while constantly stirring everything to prevent it from burning and clumping up. Try to break apart any flour bits that you see.


- Continue stirring the mixture until it becomes nice and thick. It should take you a good several minutes of cooking the Tangzhong before it arrives at a thick consistency.

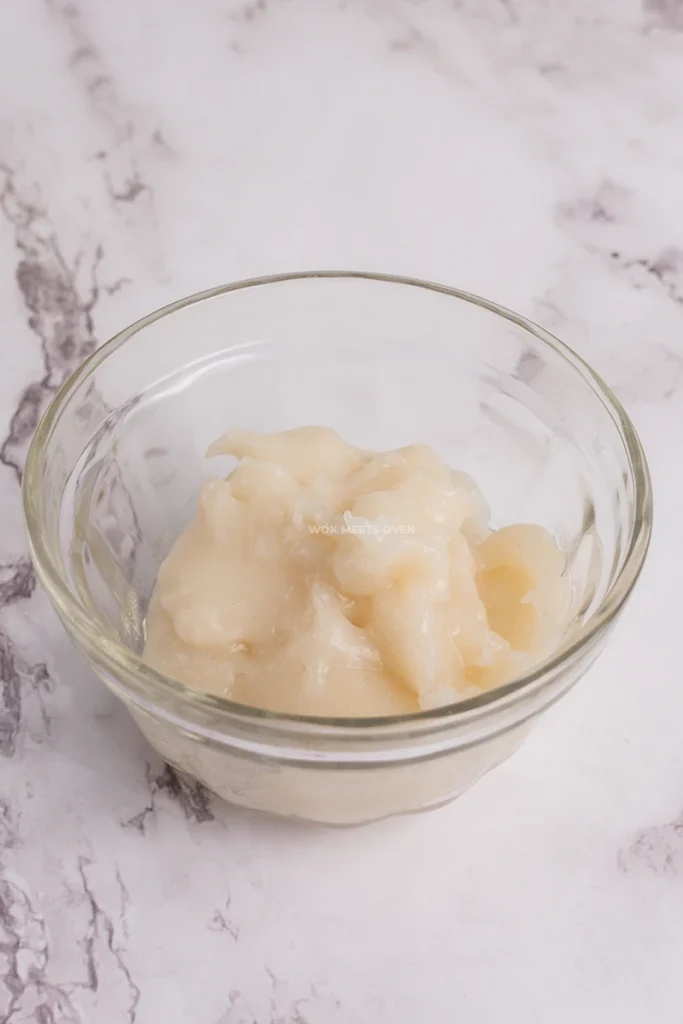
- Once the Tangzhong is ready, remove it from the stove and transfer it to a small bowl or dish. Cover it with plastic wrap, making sure to press down on the plastic wrap so that it touches and engulfs the Tanzhong to prevent it from drying.
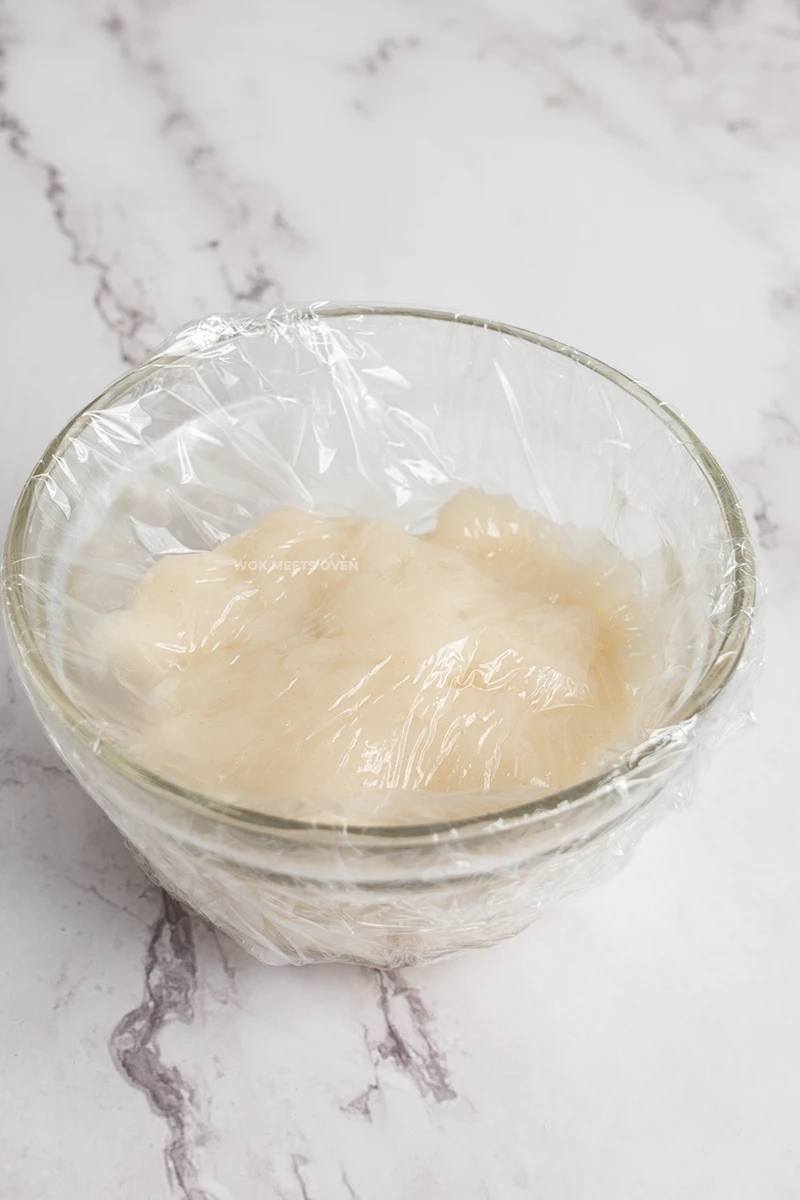
- Chill the Tangzhong in your fridge for at least 20-30 minutes, or you can make the Tangzhong overnight and use it the next day as well. Once the Tangzhong has cooled down, we can start making our dough.
Making the Dough
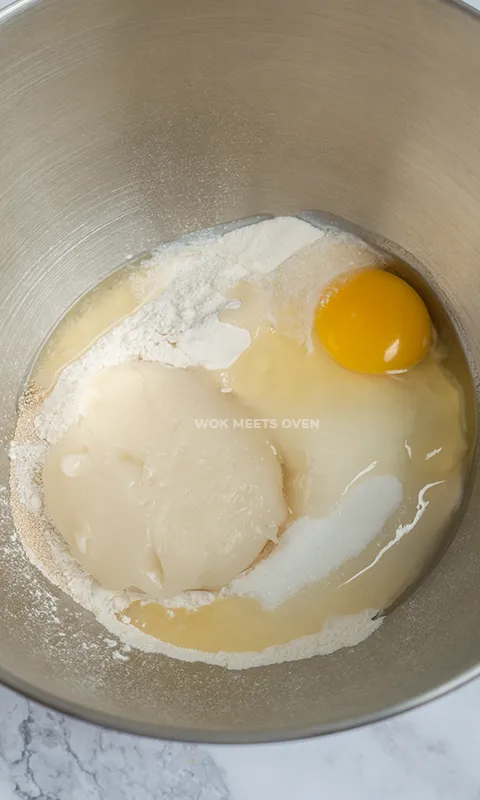
- In a large mixing bowl, add in your flour, sugar, salt, milk powder, instant yeast, an egg, and the Tangzhong and turn on the stand mixer and let it mix for a few seconds to mix all of your dry ingredients together.
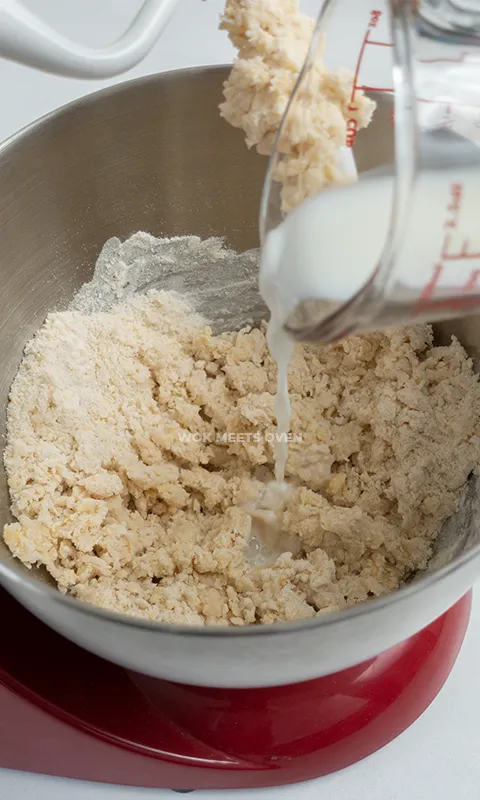
- Then turn back on your stand mixer and let it mix while slowly adding in your milk. Let the stand mixer knead the dough for 3-4 minutes.
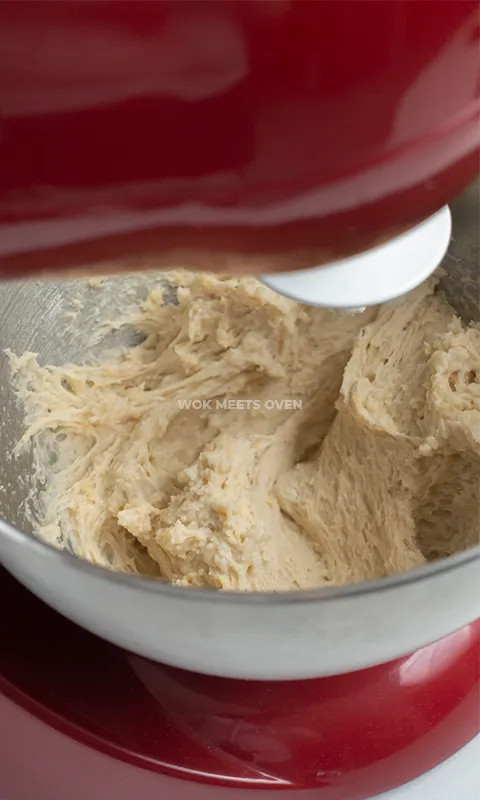
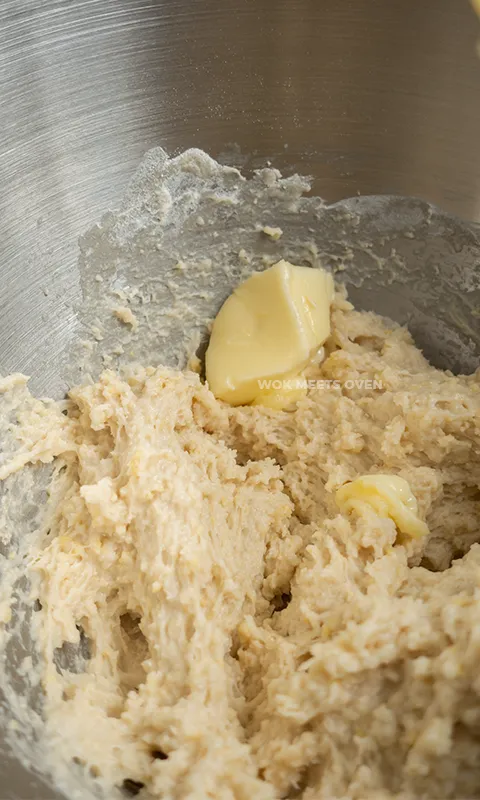
- Then add in your room temperature butter and continue kneading the dough for an additional 8-9 minutes until the dough is very smooth.
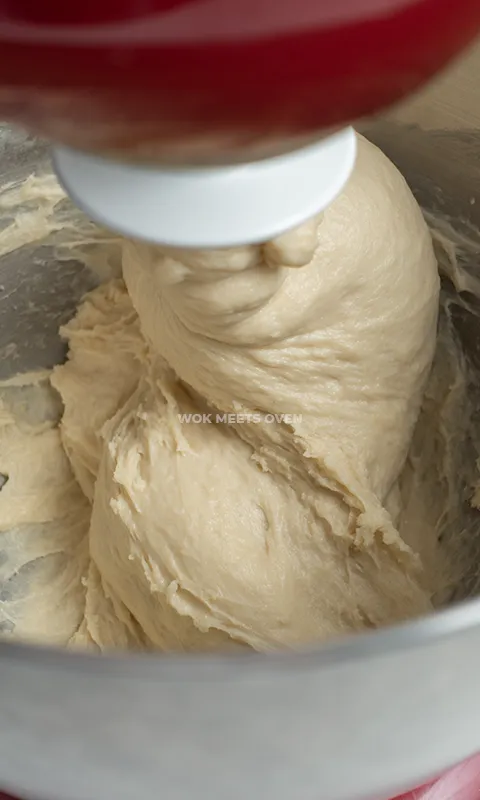
- You can check and see whether or not your dough is done kneading by applying the window pane test. Take a small piece of the dough and then stretch it out until it becomes somewhat translucent. If the dough doesn’t tear, then your dough has been sufficiently kneaded. If it tears, on the other hand, you will need to continue kneading it.

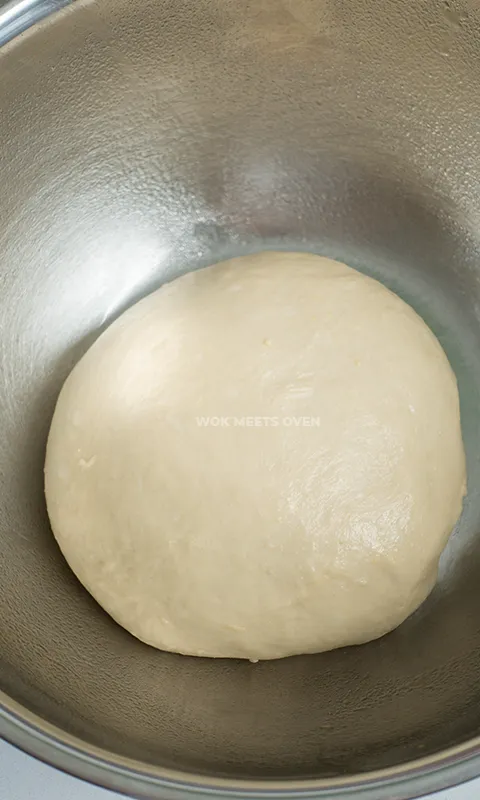
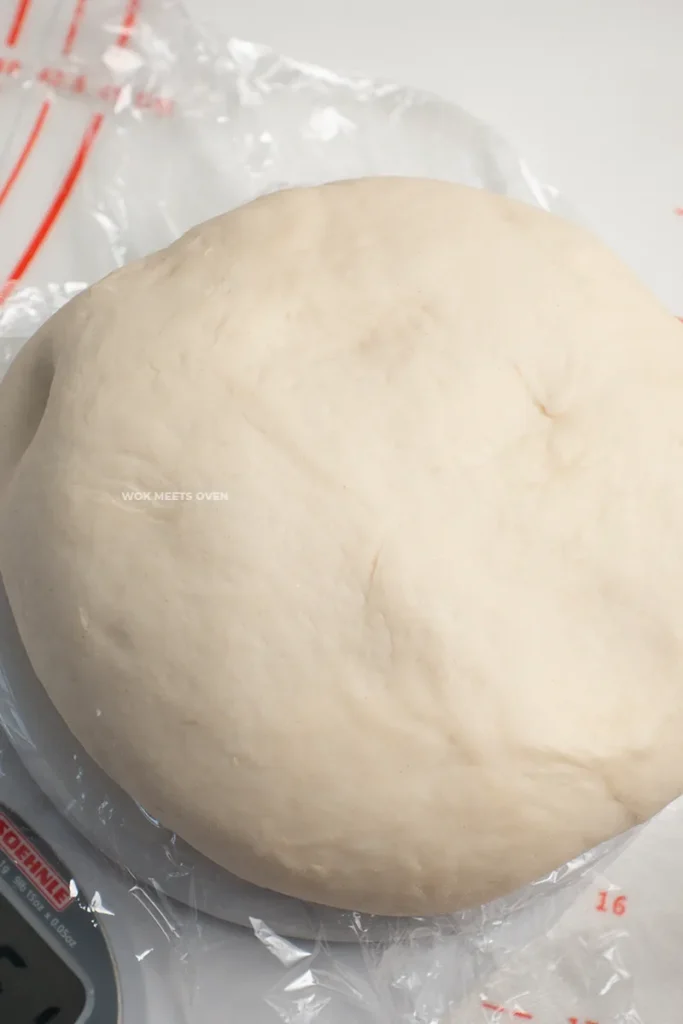
- Once done, transfer the dough to a lightly oiled large bowl. Use a spatula or add some oil or water to your hands, and then shape the dough into a round ball.
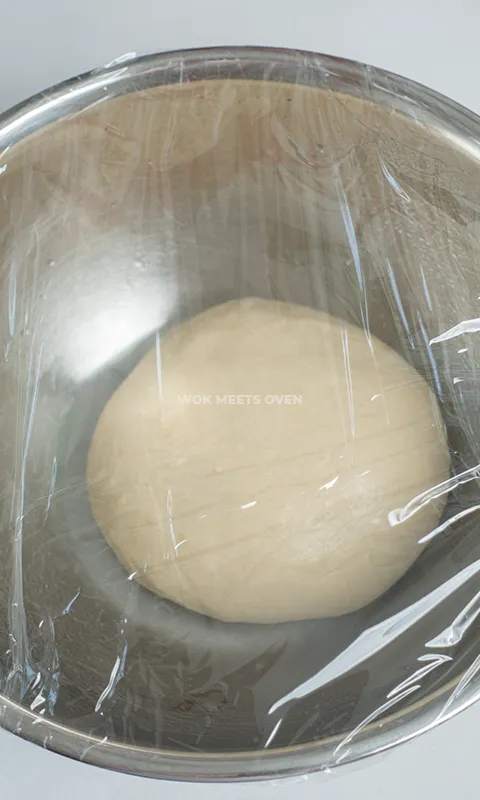
- After shaping the dough, place it back into the bowl, cover it with plastic wrap or a towel, and let it proof in a warm place until doubled in size, approximately 1 hour.
Cooking the Hot Dogs
- Now, while waiting for our dough to proof, we’ll cook our hot dogs ahead of time.
- In a large or medium-sized pot, cook your hot dogs in boiling water. Usually, the hot dogs will start to float to signal they are done cooking. Once done, drain the hot dogs and let them cool down in the kitchen before use.

Making the Buns
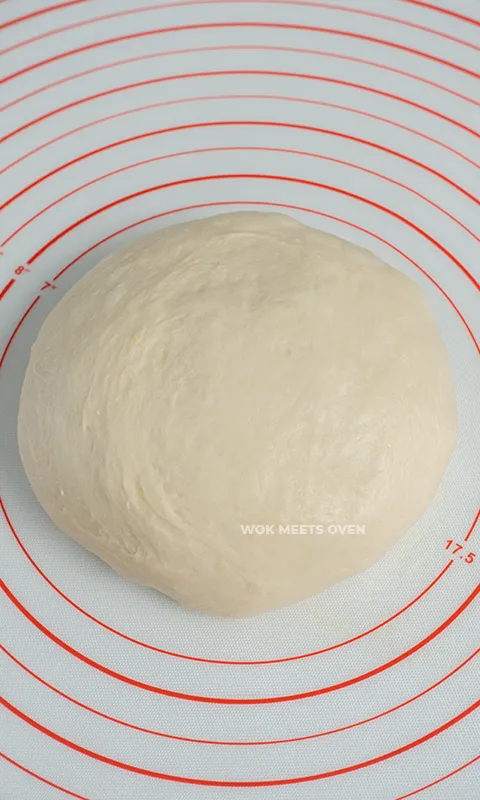
- Once the dough has finished proofing, transfer it to a floured countertop. Punch out all of the gas in the dough and then shape it into a round ball.
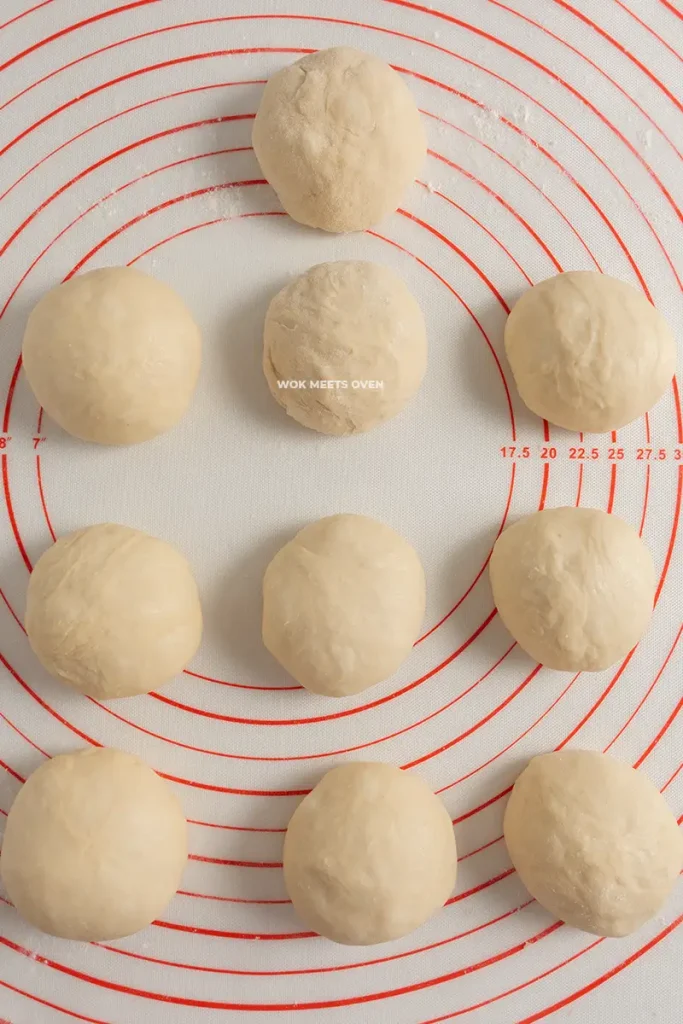
- Then weigh the dough. We’re going to divide it into 10 equal pieces, hence why we weigh out the dough.
- Next, we’re going to divide the dough into ten pieces and weigh out each piece. You can of course skip this step if you want to eyeball it and don’t care whether or not you get equal portions.
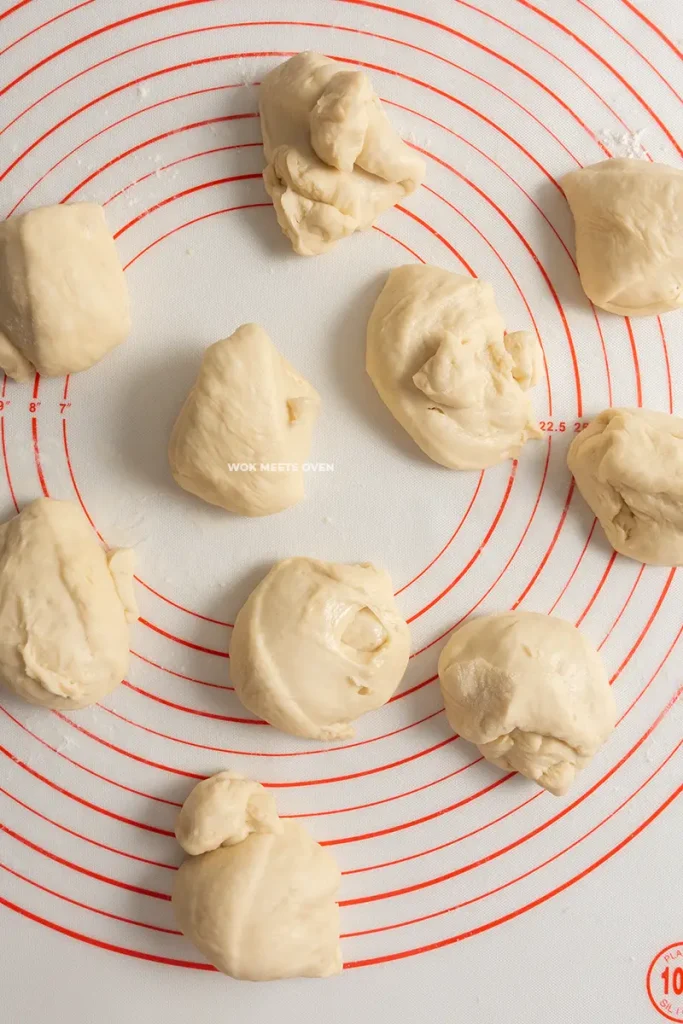
- Once you’ve divided and weighed out each piece, we’re going to start shaping our dough into round balls.
- Take 1 piece of the dough, and then using one hand, slide the dough downwards towards the center while the other hand will help rotate the dough around and pinch the bottom.
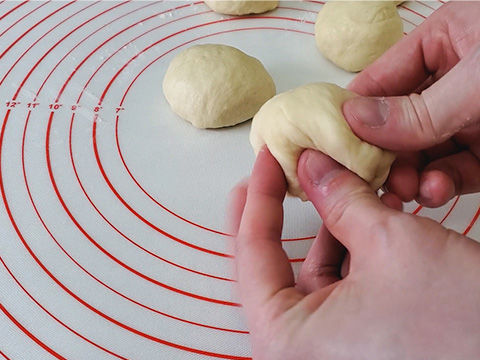
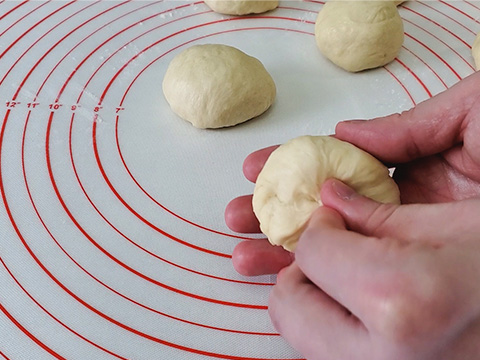
- We will then follow up by turning the dough over once it starts to resemble a ball and pinch the ends of the dough to seal it. Now, place the dough on your countertop and, using the palms of your hands, rotate the dough in a circular motion until the dough resembles a round ball.
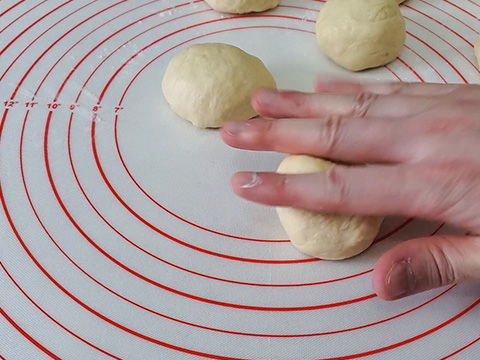
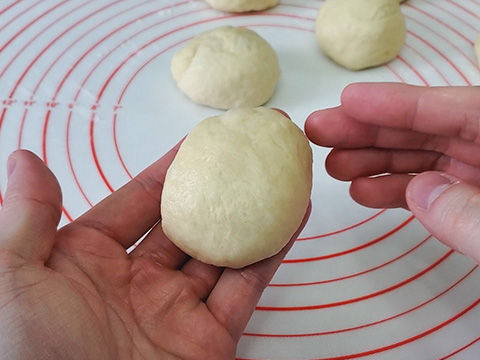
- Once done shaping all of your buns, cover them with some plastic wrap or a towel to prevent them from drying out.
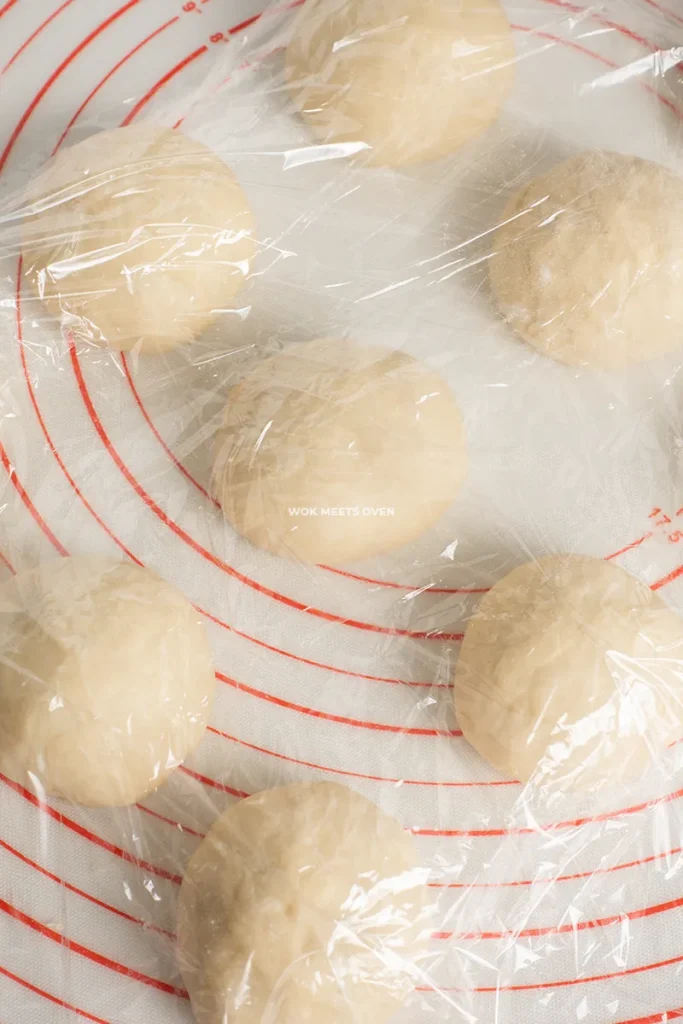
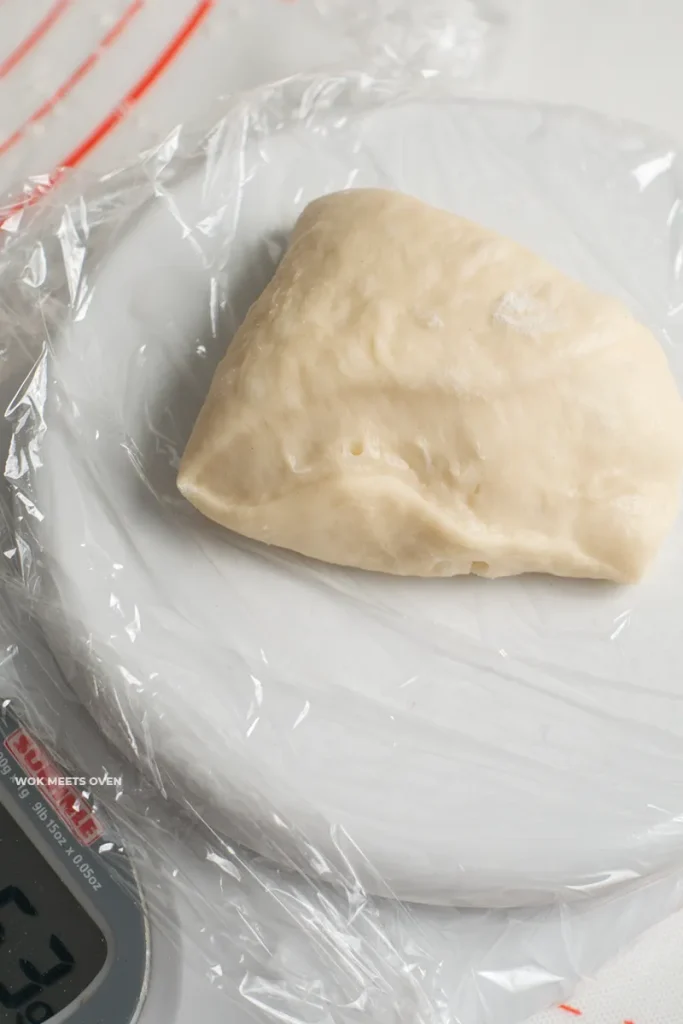
- Let the dough rest for 15-20 minutes on your countertop to relax the dough.
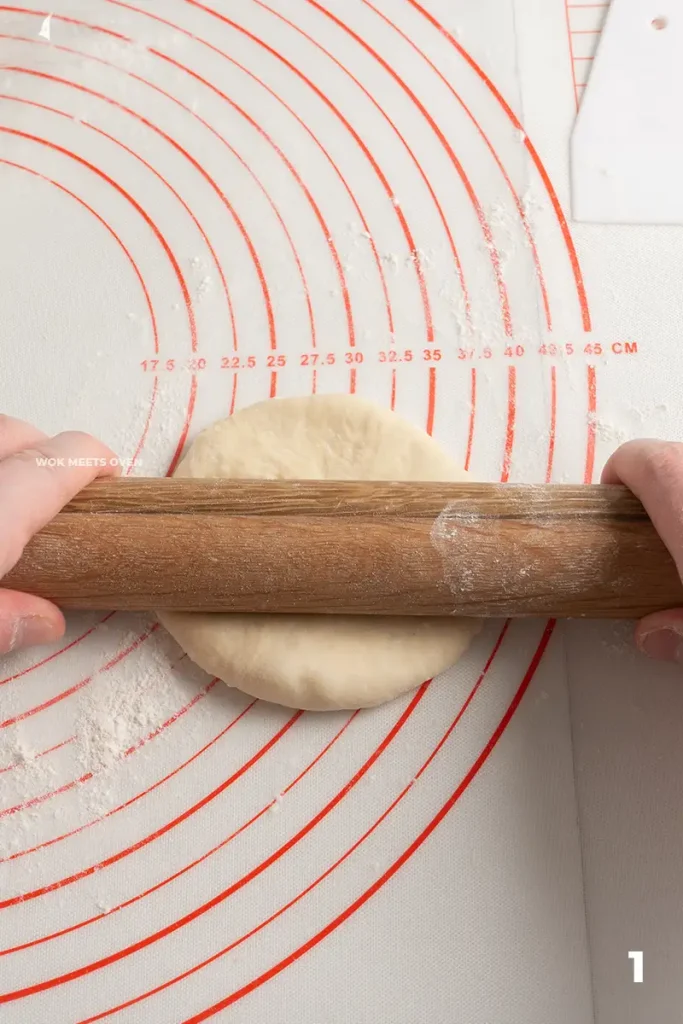
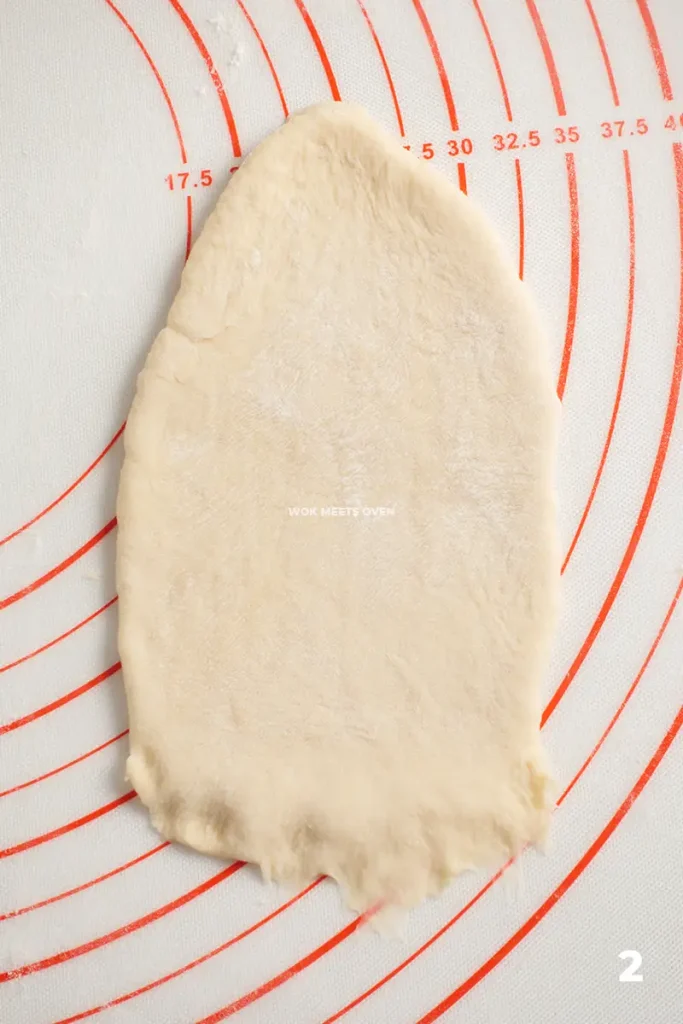
- Then take each piece of the dough, apply some flour to it to prevent it from sticking, flatten out the dough, and roll it out.
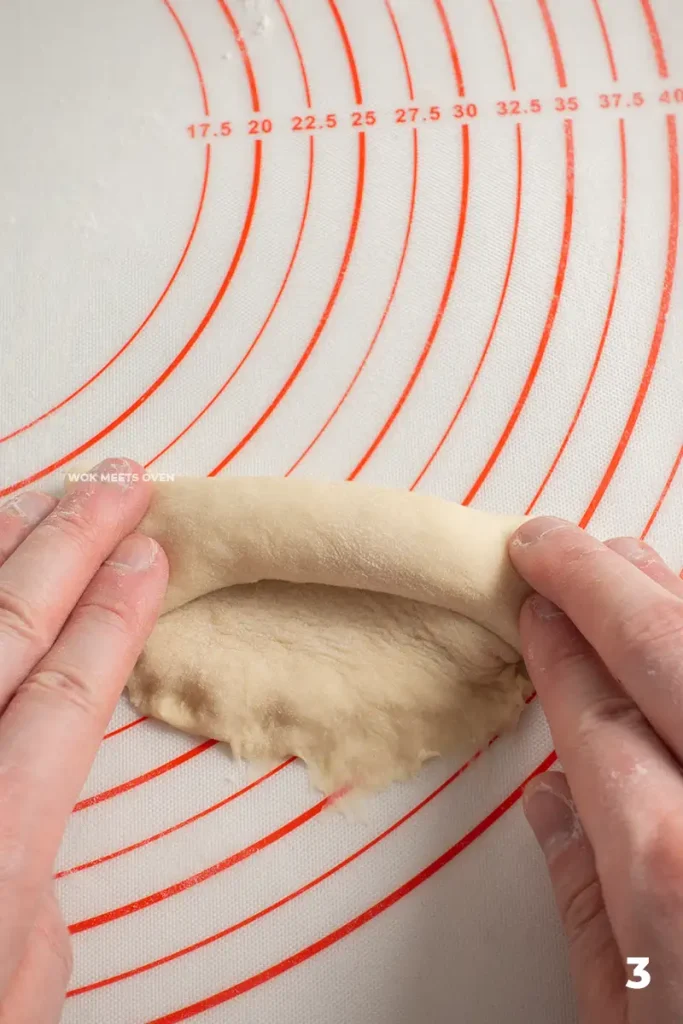
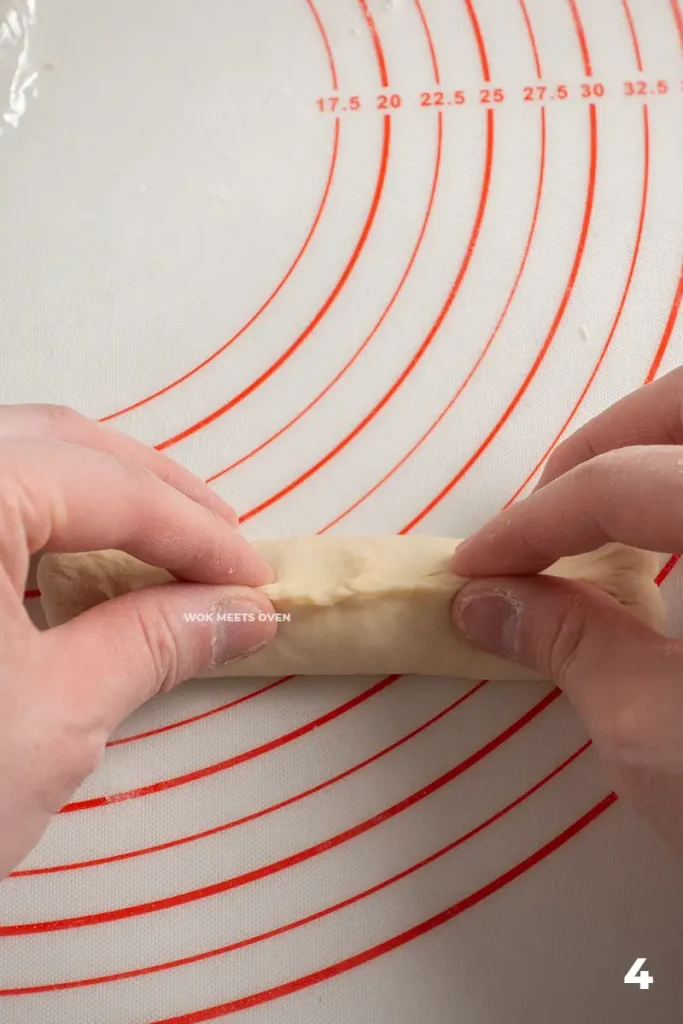
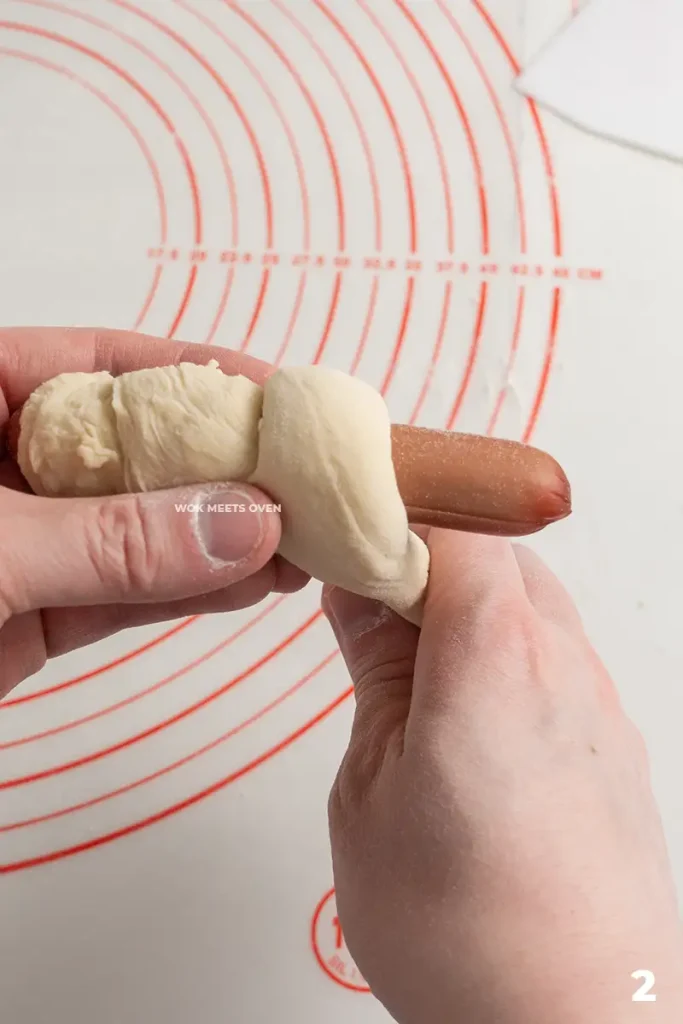
- Afterwards, start rolling the sides of the dough from the long end to the other side so that it resembles a long strip or log. Pinch the ends to seal it.
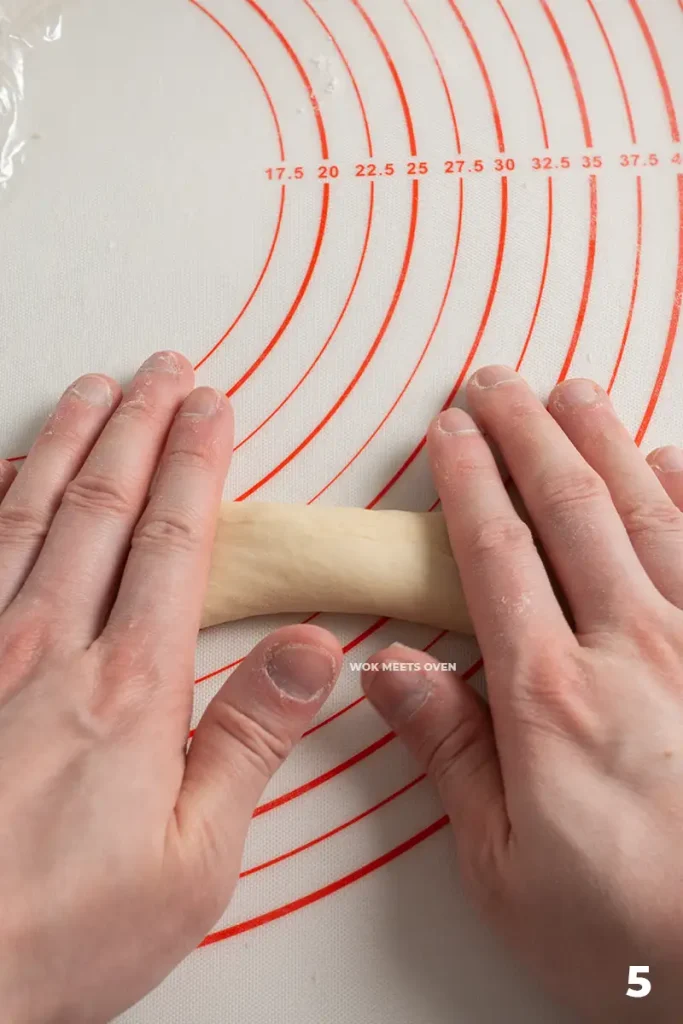
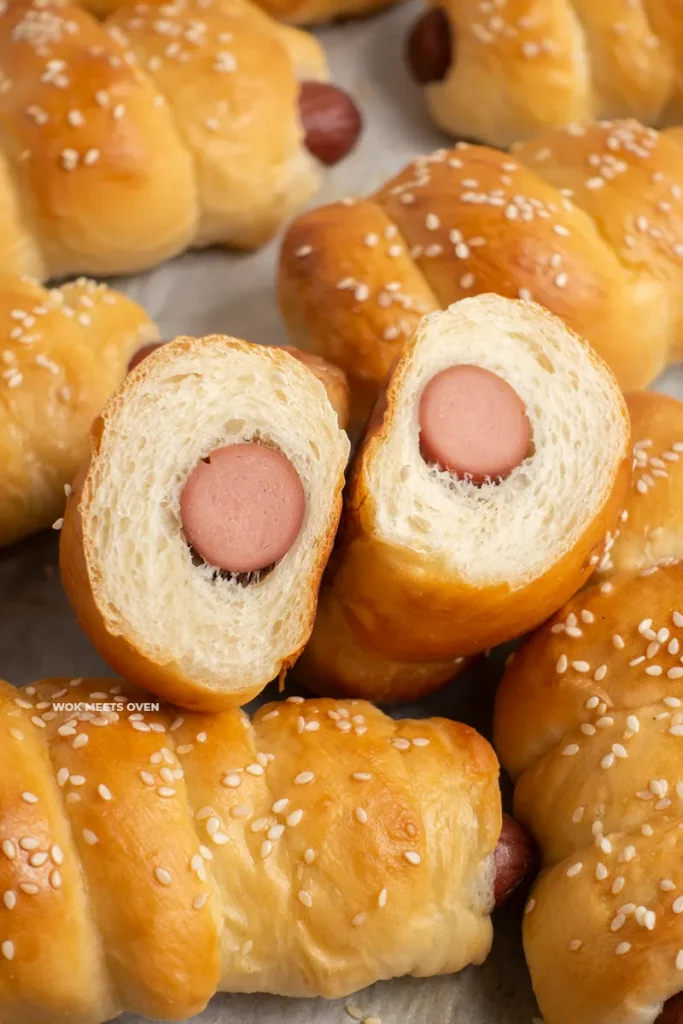
- Now roll the strip until it becomes longer (about 12-14″ long or about 2x the size of the hot dog you are using).
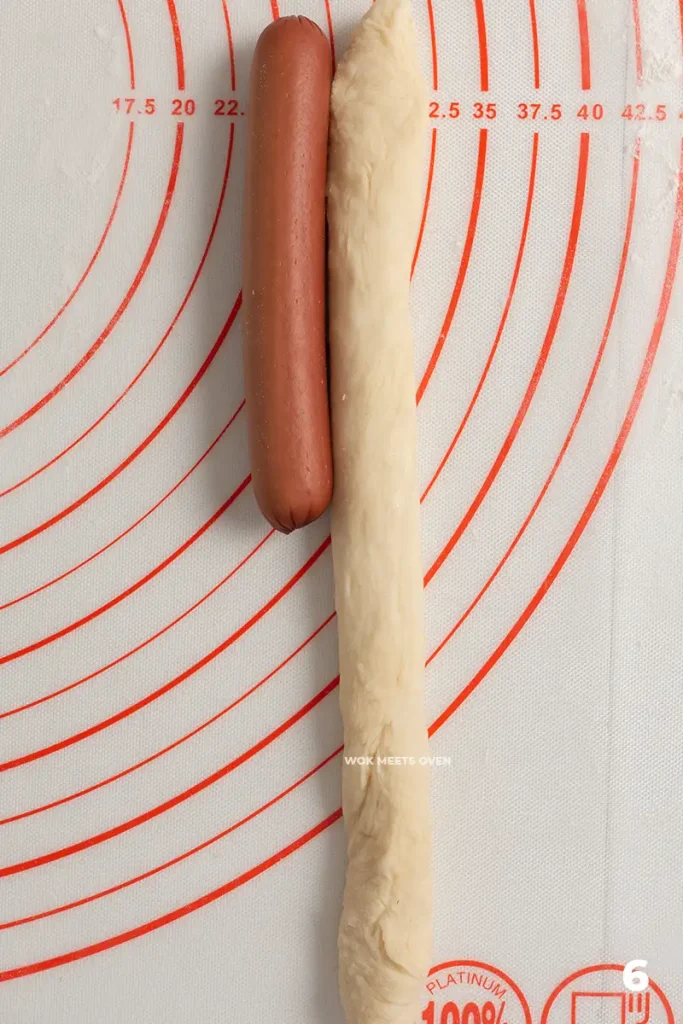
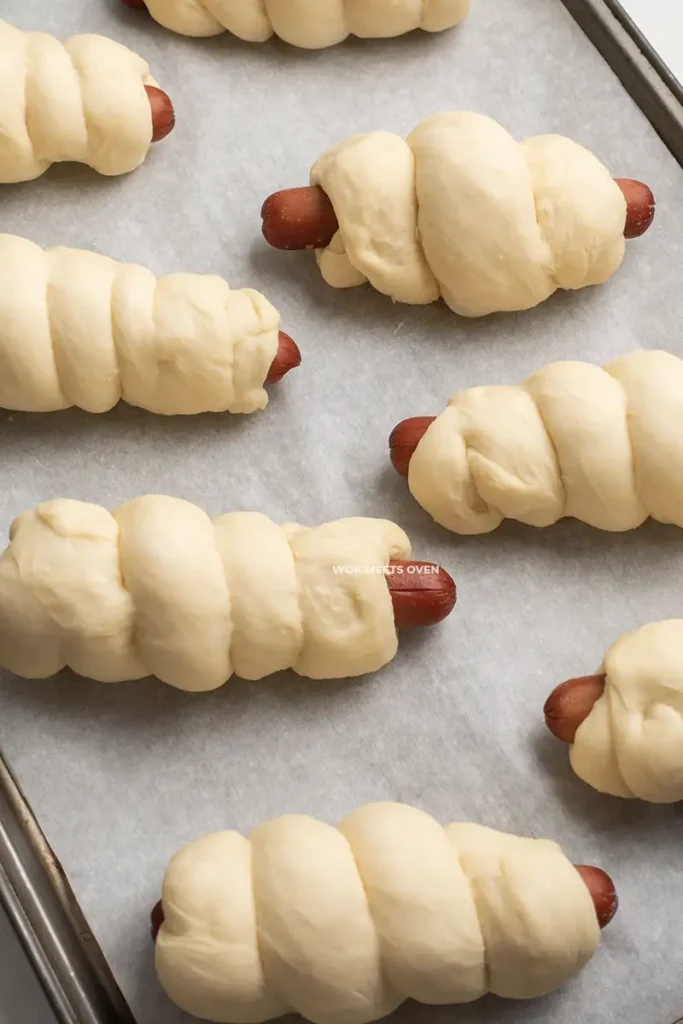
- Then take 1 piece of hot dog and wrap the strip around the hot dog in a circular motion, making sure to tuck the ends inside of the dough.
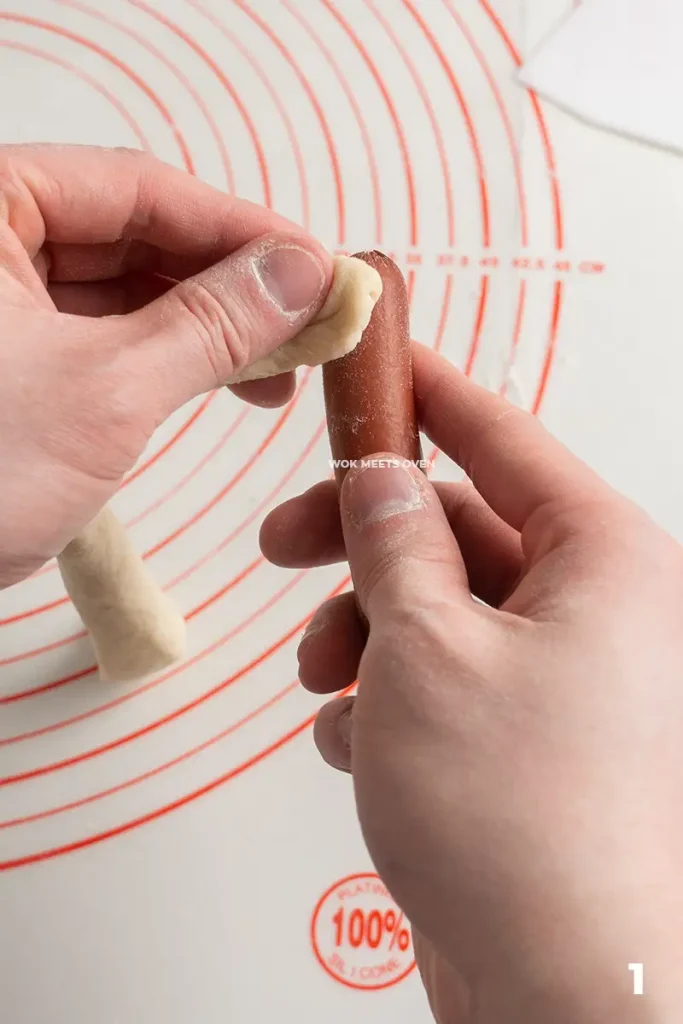
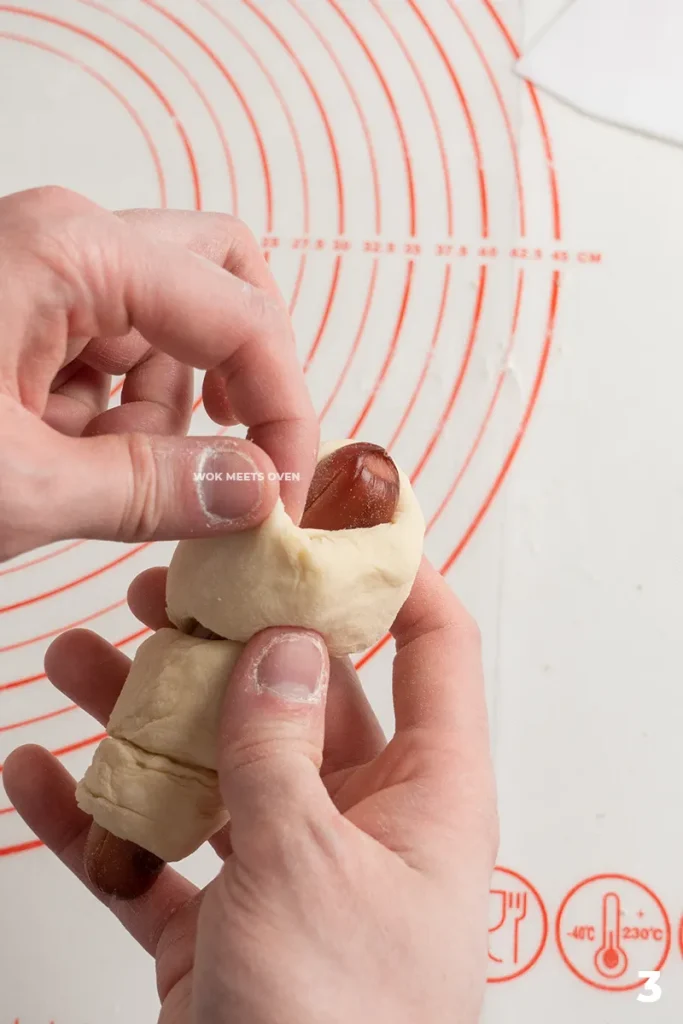
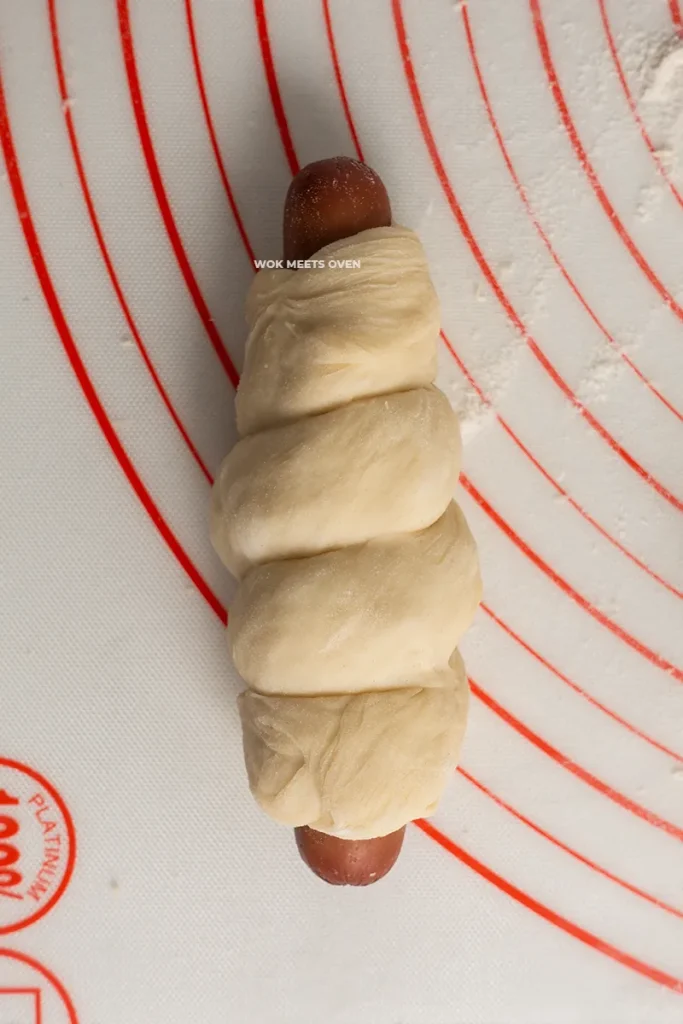
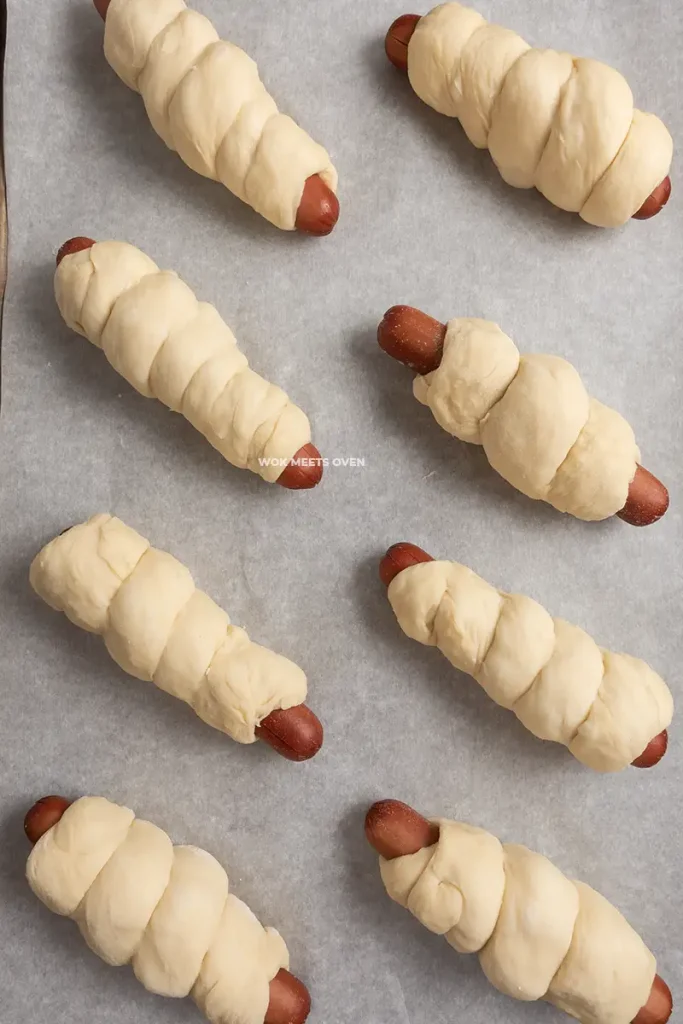
- Repeat this process for all of the other pieces. Once done, place all of the hot dog buns onto a baking tray lined with parchment paper. Then cover it with plastic wrap or a towel and let it proof in a warm place for about 40 minutes. If you don’t have a warm place, you can place the buns in your oven with a bowl of hot water.
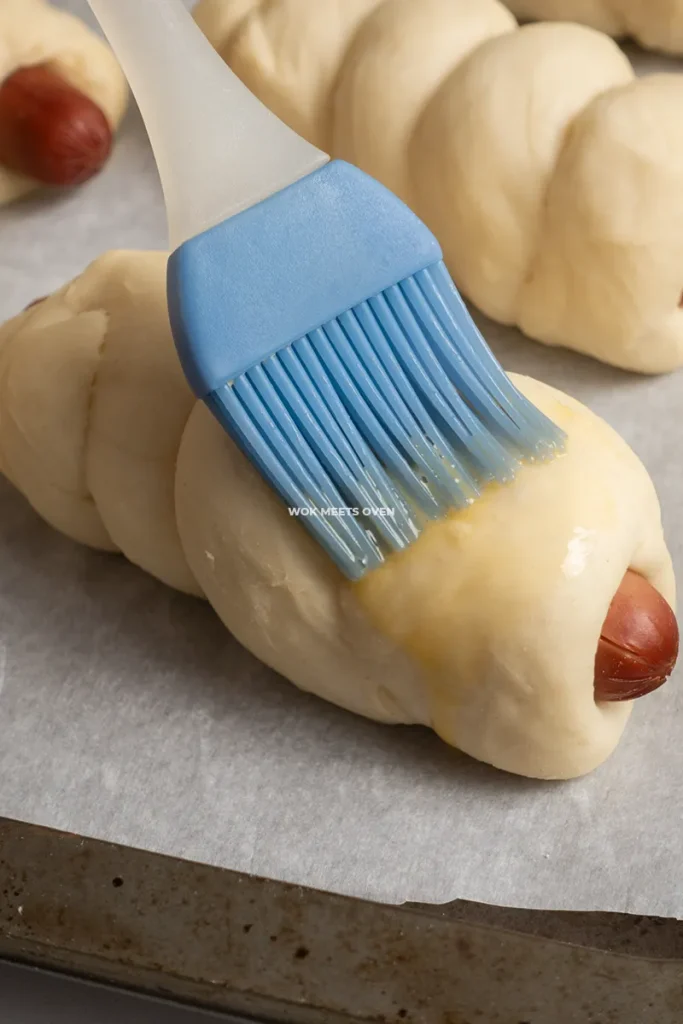
- Once the buns have finished proofing, preheat your oven to 350°F (180°C).
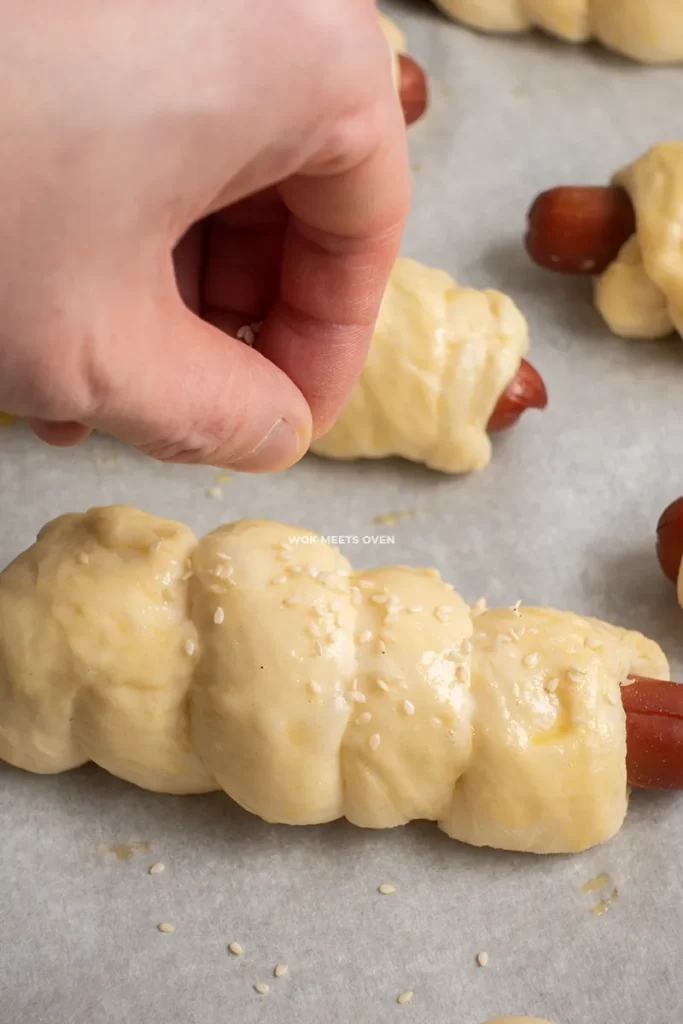
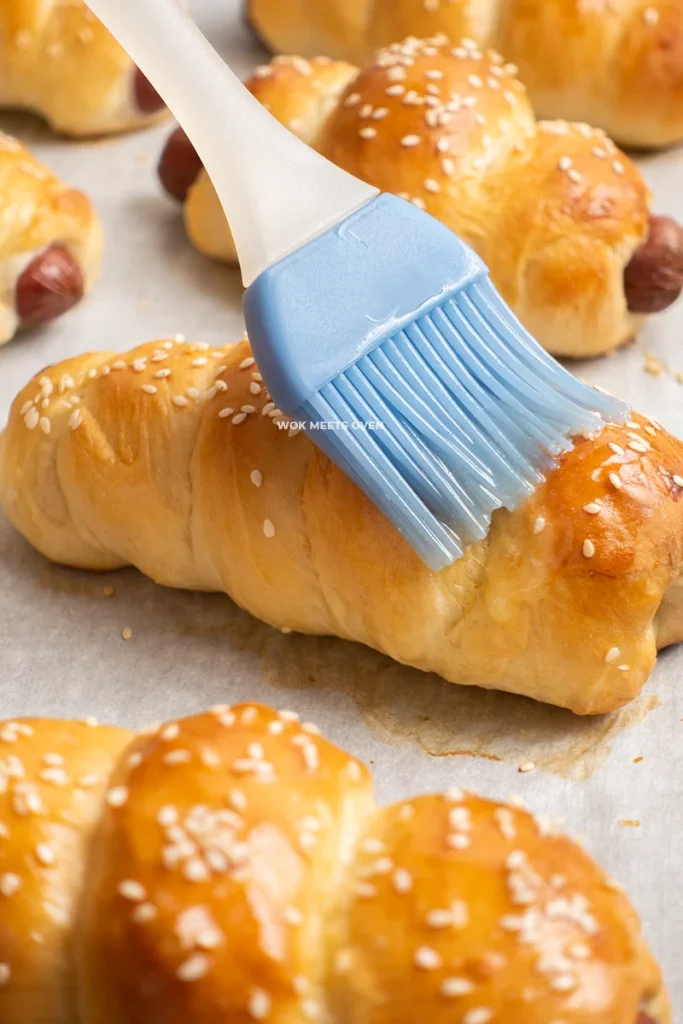
- Now we’re going to apply an egg wash to the buns. To make the egg wash, simply take 1 egg and whisk it for about 30 seconds.
- Apply the egg wash to your buns, then sprinkle some sesame seeds on top, then bake the buns in your preheated oven at 350°F (180°C) for about 12-15 minutes until the top is golden brown.
- Once the buns have been baked, apply some melted butter on top as a glaze.
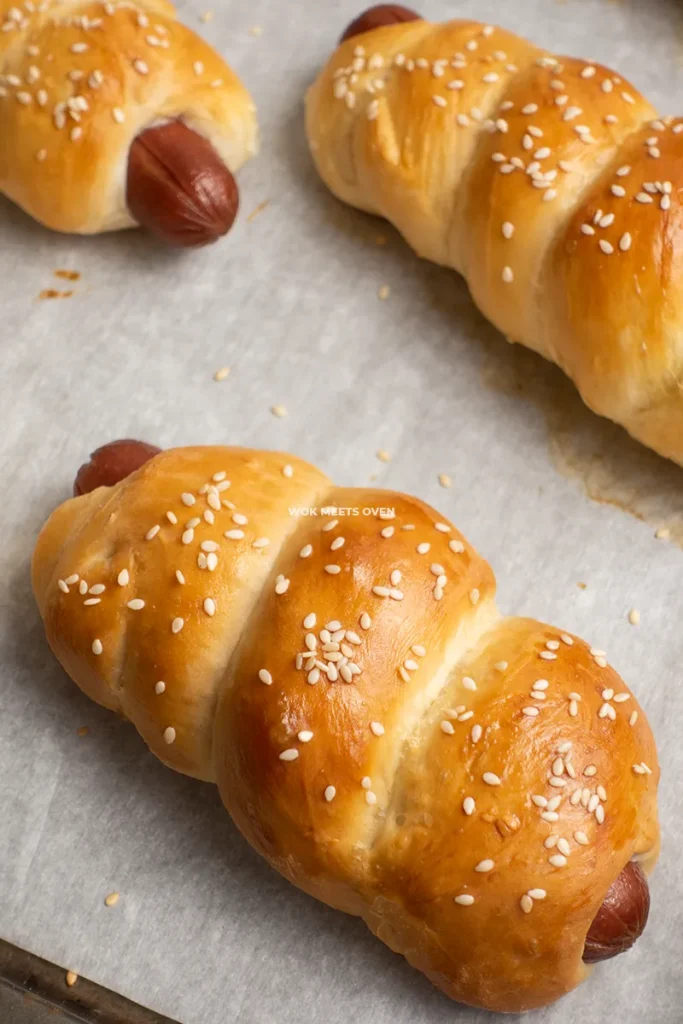
- Let the buns cool down for about 5-10 minutes and then serve while still hot.
Tips
- The dough is very sticky due to the high water content, which makes the buns extra soft and fluffy when baked; therefore, it is highly recommended that you use a stand mixer when kneading the dough. With that being said, however, you can still hand-knead the dough if you don’t have a stand mixer. Just expect it to be very sticky to knead and may require a bit more time when kneading.
- Oven temperatures will vary between ovens, so you may need to readjust the temperature as well.
- In addition to garnishing the top with sesame seeds and brushing butter, you can also garnish it with whatever type of garnish you prefer. Some common garnishes include parsley and Japanese mayonnaise.
Storage Tips
The buns can be stored in an airtight container for up to 5 days in the fridge or the freezer for up to a month.
How to Reheat Chinese Hot Dog Buns
Simply place them in the microwave and heat until the buns are warm.
Recipes That Go Well With Chinese Hot Dog Buns
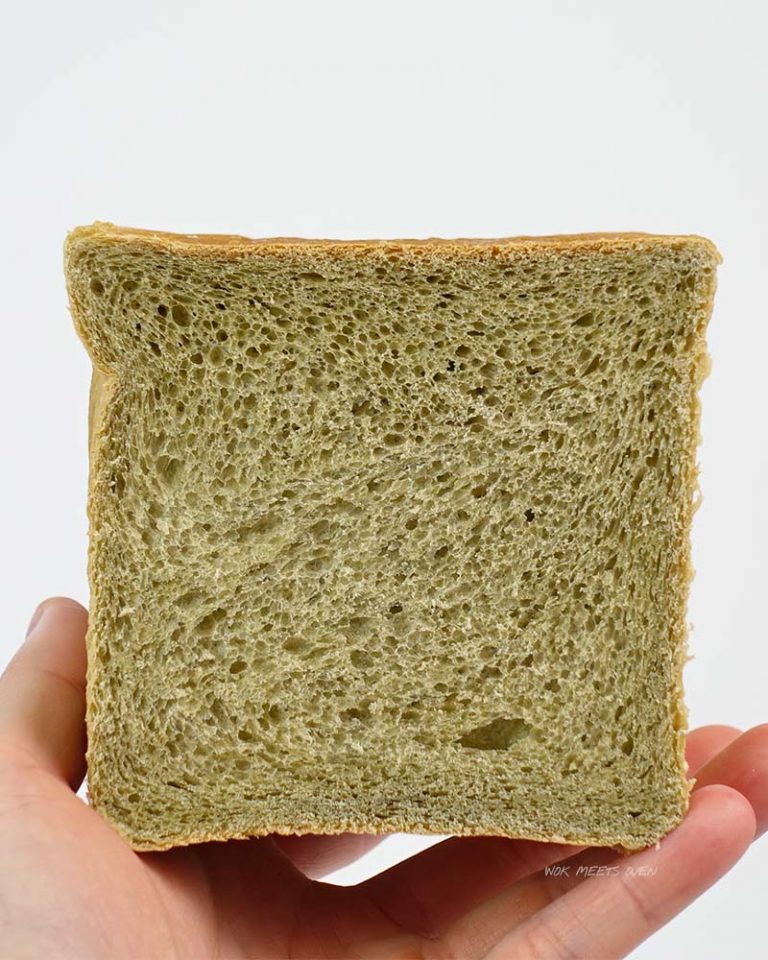
Other classic Chinese bun recipes you might enjoy include my Chinese pineapple bun recipe, Chinese coconut cream buns, and Chinese baked BBQ pork buns (char siu bao).
Frequently Asked Questions (F.A.Q.S)
Can I Use Dry Active Yeast Instead of Instant Yeast?
Yes, absolutely! If you’re using dry active yeast, make sure that you proof the yeast in a warm liquid such as water or milk, in our case, along with some sugar. You should see the yeast foam up at the top and produce a very yeasty smell. If you see this, that means your yeast is good to use.
How Long Can I Store the Buns For?
You can store the buns in the fridge for up to 5 days or in the freezer for up to 3 months. Make sure that you reheat the buns either in a microwave or the oven if you stored them in the fridge or freezer to give them back their nice soft texture.
How Come My Dough Is Not Rising?
There could be a number of reasons, such as the following:
- Your yeast is dead. Check if your yeast is still alive by adding 1 tsp of yeast, along with 1 tsp of sugar to 1/2 cup of warm water, give it a good mix, then let it sit for 10-15 minutes. If it starts to foam at the top with a very yeasty smell, then your yeast is still alive.
- Your environment is too cold. Yeast rises best in a warm environment
- You mixed in hot water with the yeast and killed it.
- You didn’t knead the dough sufficiently enough. Use the window-pane test to check if your dough has been kneaded properly.
I Don’t Own a Stand Mixer, Can I Hand Knead the Dough?
Yes, you can; however, do realize that the dough is sticky and will be more difficult to knead by hand. That is why it is strongly recommended that you use a stand mixer to make life easier for you. Furthermore, you may need to spend a little more time kneading it compared to using a stand mixer; however, it is definitely possible to hand knead it.
Other bread recipes you’ll love
- Chinese Sausage Bread Buns
- Chinese Tuna Buns
- Chinese Pineapple Buns (Bolo Bao) Recipe
- Chinese Pork Floss Buns Recipe
- Hong Kong Spam and Egg Bun
- Steamed Chinese Sausage Buns
You can pin this image

Chinese hot dog buns
Equipment
- 1 stand mixer
- 1 Saucepan
Ingredients
Tangzhong
- 125 ml water
- 25 grams bread flour
Dough
- 300 grams bread flour
- 100 ml milk
- 1 egg (room temperature)
- 5 grams instant yeast
- 20 grams unsalted butter
- 40 grams white granulated sugar
- 2 grams table salt
- 6 grams milk powder
- 10 hotdogs
Egg wash
- 1 egg
Garnish
- sesame seeds
Glaze
- 1 tbsp melted butter
Instructions
Making the Tangzhong
- To make the Tangzhong, in a small sauce pan, add in your water and bread flour and mix everything well together. Heat this mixture over low heat while constantly stirring everything to prevent it from burning and clumping up. Try to break apart any flour bits that you see.
- Continue stirring the mixture until it becomes nice and thick. It should take you a good several minutes of cooking the Tangzhong before it arrives at a thick consistency.
- Once the Tangzhong is ready, remove it from the stove and transfer it to a small bowl or dish. Cover it with plastic wrap, making sure to press down on the plastic wrap so that it touches and engulfs the Tanzhong to prevent it from drying.
- Chill the Tangzhong in your fridge for at least 20-30 minutes, or you can make the Tangzhong overnight and use it the next day as well. Once the Tangzhong has cooled down, we can start making our dough.
Making the Dough
- In a large mixing bowl, add in your flour, sugar, salt, milk powder, instant yeast, an egg, and the Tangzhong and turn on the stand mixer and let it mix for a few seconds to mix all of your dry ingredients together.
- Then turn back on your stand mixer and let it mix while slowly adding in your milk. Let the stand mixer knead the dough for 3-4 minutes.
- Then add in your room temperature butter and continue kneading the dough for an additional 8-9 minutes until the dough is very smooth.
- You can check and see whether or not your dough is done kneading by applying the window pane test. Take a small piece of the dough and then stretch it out until it becomes somewhat translucent. If the dough doesn’t tear, then your dough has been sufficiently kneaded. If it tears, on the other hand, you will need to continue kneading it.
- Once done, transfer the dough to a lightly oiled large bowl. Use a spatula or add some oil or water to your hands, and then shape the dough into a round ball.
- After shaping the dough, place it back into the bowl, cover it with plastic wrap or a towel, and let it proof in a warm place until doubled in size, approximately 1 hour.
Cooking the Hot Dogs
- Now, while waiting for our dough to proof, we’ll cook our hot dogs ahead of time.
- In a large or medium-sized pot, cook your hot dogs in boiling water. Usually, the hot dogs will start to float to signal they are done cooking. Once done, drain the hot dogs and let them cool down in the kitchen before use.
Making the Buns
- Once the dough has finished proofing, transfer it to a floured countertop. Punch out all of the gas in the dough and then shape it into a round ball.
- Then weigh the dough. We’re going to divide it into 10 equal pieces, hence why we weigh out the dough.
- Next, we’re going to divide the dough into ten pieces and weigh out each piece. You can of course skip this step if you want to eyeball it and don’t care whether or not you get equal portions.
- Once you’ve divided and weighed out each piece, we’re going to start shaping our dough into round balls.
- Take 1 piece of the dough, and then using one hand, slide the dough downwards towards the center while the other hand will help rotate the dough around and pinch the bottom.
- We will then follow up by turning the dough over once it starts to resemble a ball and pinch the ends of the dough to seal it. Now, place the dough on your countertop and, using the palms of your hands, rotate the dough in a circular motion until the dough resembles a round ball.
- Once done shaping all of your buns, cover them with some plastic wrap or a towel to prevent them from drying out.
- Let the dough rest for 15-20 minutes on your countertop to relax the dough.
- Then take each piece of the dough, apply some flour to it to prevent it from sticking, flatten out the dough, and roll it out.
- Afterwards, start rolling the sides of the dough from the long end to the other side so that it resembles a long strip or log. Pinch the ends to seal it.
- Now roll the strip until it becomes longer (about 12-14″ long or about 2x the size of the hot dog you are using).
- Then take 1 piece of hot dog and wrap the strip around the hot dog in a circular motion, making sure to tuck the ends inside of the dough.
- Repeat this process for all of the other pieces. Once done, place all of the hot dog buns onto a baking tray lined with parchment paper. Then cover it with plastic wrap or a towel and let it proof in a warm place for about 40 minutes. If you don’t have a warm place, you can place the buns in your oven with a bowl of hot water.
- Once the buns have finished proofing, preheat your oven to 350°F (180°C).
- Now we’re going to apply an egg wash to the buns. To make the egg wash, simply take 1 egg and whisk it for about 30 seconds.
- Apply the egg wash to your buns, then sprinkle some sesame seeds on top, then bake the buns in your preheated oven at 350°F (180°C) for about 12-15 minutes until the top is golden brown.
- Once the buns have been baked, apply some melted butter on top as a glaze.
- Let the buns cool down for about 5-10 minutes and then serve while still hot.